A DIY Murphy desk can work as both a compact workstation and a decorative wall feature, but the design has to be planned around structure first. The folded desk should look intentional when closed, while the hinges, wall attachment, support system and work surface remain appropriate for the expected load.
This guide focuses on the decisions that matter most: sizing the desk to the wall, choosing suitable sheet goods or lumber, selecting hardware rated for the application, anchoring into appropriate structure, and finishing the closed face so it reads more like decor than utility furniture.
Use the ideas here as a planning framework rather than a universal cut list. Wall construction, desk width, material thickness and hardware capacity all change the safe dimensions of a fold-down desk.
Quick planning checklist
- Measure the wall, floor clearance and nearby door or furniture swing before choosing the desk size.
- Design the wall attachment and support system for the expected load; do not rely on decorative trim or drywall alone.
- Use hinges, fasteners and brackets with published load guidance appropriate to the desk design.
- Keep the closed face visually simple so the unit can read as wall decor when not in use.
- Plan cable routing, lighting and storage before mounting the desk so they do not interfere with folding.
Why a Murphy desk can work as both furniture and wall decor
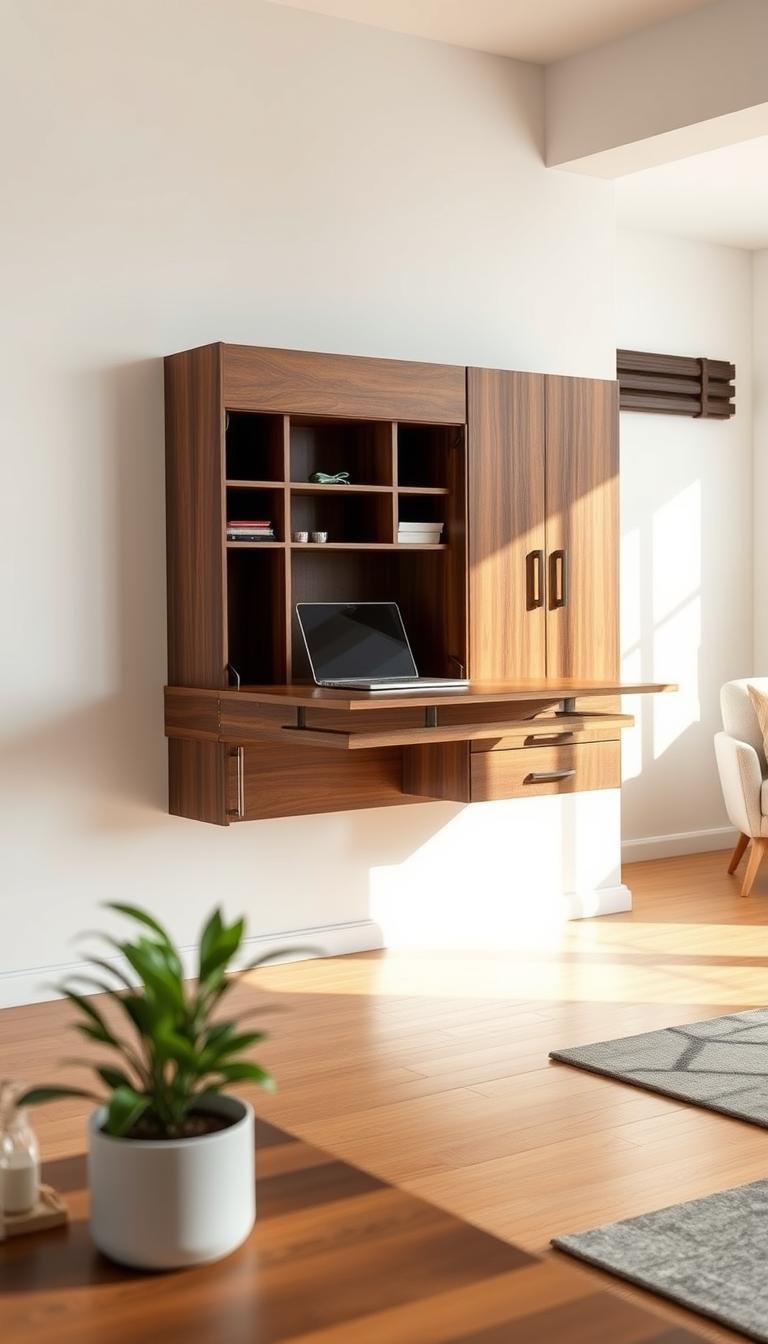
A fold-down desk is useful in small rooms because the work surface disappears when it is not needed. The closed face can also become part of the room visually instead of looking like office equipment left on display.
The simplest way to make the desk feel intentional is to treat the exterior like a cabinet front or framed panel. Paint, veneer, shallow molding or a restrained graphic treatment can work well, provided nothing interferes with hinges, latches or the opening path.
Useful design ideas include:
- a painted or veneered outer panel;
- simple molding that stays clear of moving hardware;
- a low-profile pull or magnetic latch;
- shallow interior shelving that does not obstruct the desktop when closed.
Function should still lead the design. The desk needs enough surface area for the intended work, adequate knee clearance, secure support, and a comfortable opening height. Decorative details come after those dimensions are resolved.
| Functional Benefit | Artistic Opportunity | Space Impact |
|---|---|---|
| Folds against wall | Becomes decorative surface | Saves floor space |
| Provides work surface | Custom finish options | Defines room area |
| Offers storage | Display shelving integration | Reduces clutter |
| Supports organization | Hardware as decor | Creates visual order |
Well-executed Murphy desks demonstrate everyday items can become artistic statements. A bit of vision transforms basic furniture into personal expressions. The result serves practical needs while reflecting individual style.
Materials and hardware to plan before building
Choose the material system only after you know the desk width, depth and expected load. Plywood is often practical for a fold-down work surface because it is dimensionally stable and available in predictable thicknesses, while solid lumber can work for frames, trim and decorative faces.
Core materials and hardware
A typical build may require a desktop panel, a wall-mounted frame or cabinet, hinges, a positive closing latch, and either folding brackets, stays, chains or another support system designed for the load. The exact components depend on the design.
Do not copy arbitrary screw sizes or support dimensions from a generic plan. Match fasteners to the wall structure and hardware manufacturer’s instructions, and make sure the hinge and support system are rated for the desk size and intended use.
- desktop and cabinet/frame material;
- load-rated hinges and support hardware;
- appropriate structural fasteners for the wall;
- a secure latch for the closed position;
- finish materials such as paint, veneer or clear coat.
Tools you are likely to need
The exact tool list depends on the design, but most builds need accurate measuring and layout tools, a drill/driver, clamps, and a saw appropriate to the material. A jigsaw is useful for curved cuts; a circular saw or track saw is often more suitable for straight sheet-good cuts.
Pilot holes, square assemblies and clean edges matter more than decorative routing. Use the tool manufacturer’s safety guidance, support workpieces properly, and avoid cutting or routing parts freehand when a guide or clamp can control the cut.
Choosing materials for strength and appearance
Prioritize stiffness, dimensional stability, weight and finish compatibility. A decorative species is not automatically a better structural choice, and reclaimed lumber should be checked carefully for flatness, hidden fasteners and defects before use.
Consider:
- the expected desktop load;
- the total weight the wall attachment must carry;
- material thickness and stiffness;
- how the chosen finish behaves on that material;
- whether the closed face needs trim, veneer or paint.
Test finishes on offcuts first. That is especially useful with plywood edges, veneered panels and mixed materials, where color and sheen can differ more than expected.
What if the wall is only 3 feet wide?
A 36-inch wall can still support a useful fold-down workstation, but the open depth and chair clearance matter more than maximizing width.
Mock up the desktop with cardboard or painter’s tape before drilling. Check:
- door and closet swings;
- outlets, switches and trim;
- chair pull-back space;
- monitor and laptop depth;
- the path through the room when the desk is open;
- how far the closed cabinet projects from the wall.
On a very short wall, a simple hinged desktop may provide more usable work surface than a deep cabinet desk. A cabinet format is more useful when concealed storage is essential. In either case, size the hardware and wall attachment around the actual desktop weight and working load rather than copying a generic 36-inch cut list.
A safer build sequence
Build the project around the wall structure and hardware system rather than around a decorative shape. The desk can be customized visually later; the support geometry has to work first.
1. Size the desk to the room
Measure wall width, available height, nearby furniture, outlet locations and the floor area needed when the desktop is open. Decide the working height from the person and chair that will actually use the desk rather than copying a generic number.
2. Choose the support method
Use a support system with published capacity appropriate to the desktop size and intended load. Depending on the design, that may be folding brackets, stays, chains or another purpose-built mechanism. The wall attachment, hinges and supports all need to work as one system.
3. Build the frame and desktop square
Cut the cabinet/frame and desktop parts accurately, dry-fit them, and check that the assembly remains square before final fastening. Predrill where the material or fastener calls for it, and keep moving hardware clear of trim and storage compartments.
4. Locate structural attachment points
Mounting requirements vary with wall construction. Where the design depends on framing, locate suitable studs or other structural backing and use fasteners appropriate to that substrate and to the hardware manufacturer’s instructions. Do not rely on drywall alone for a load-bearing desk unless a specifically engineered system says it is suitable.
5. Test the mechanism before loading it
Open and close the desk slowly and check hinge alignment, latch engagement, support deployment and clearances. Correct rubbing, binding or loose hardware before placing equipment on the surface.
If the wall construction is uncertain, the desk is unusually wide or heavy, or the support method is improvised rather than manufacturer-rated, have the mounting plan reviewed by a qualified carpenter or other appropriate professional.
Make the closed desk look intentional
Once the structure and movement work correctly, the folded face can be treated like a cabinet front, framed panel or piece of wall decor.
Prepare the surface first
Sand and fill according to the material and finish manufacturer’s instructions. Plywood edges may need edge banding, filler or trim if you want a furniture-like appearance.
Use decorative details that do not interfere with the mechanism
Paint, veneer, removable wallpaper, shallow molding or a cork panel can add character, but keep added thickness and hardware clear of hinges, latches and the opening path. Low-profile details are usually easier to live with than heavy applied decoration.
Choose a finish compatible with the material
Use a commercially formulated paint, stain, oil or clear finish according to its label rather than mixing an improvised finish recipe. Test a sample first, provide the ventilation and protective equipment the product requires, and allow full cure time before closing the desk against finished surfaces.
For related small-space ideas, browse the Dwelanor Room Guides, the Small Living Room Playbook, and our Murphy-bed planning guide for a 10×10 guest room.
Conclusion
A Murphy desk can look like wall art when it is closed, but the project succeeds only if the structure, hardware and mounting are resolved before the decorative details.
Measure the room, choose a support system with appropriate published capacity, attach it to suitable structure, test the movement unloaded, and then finish the exterior to suit the room.
Recheck moving hardware periodically and follow the hardware manufacturer’s maintenance guidance. If anything loosens, binds or shifts at the wall, stop using the desk until the cause is corrected.