What’s the easiest way to add a hidden charging station inside a nightstand?
I’ll show my simplest DIY project that cleared clutter, kept my devices charged, and made my bed area feel calm again. This setup used a cordless drill with a 1 3/8″ spade bit, a surge-protected strip, and some Velcro for mounting.
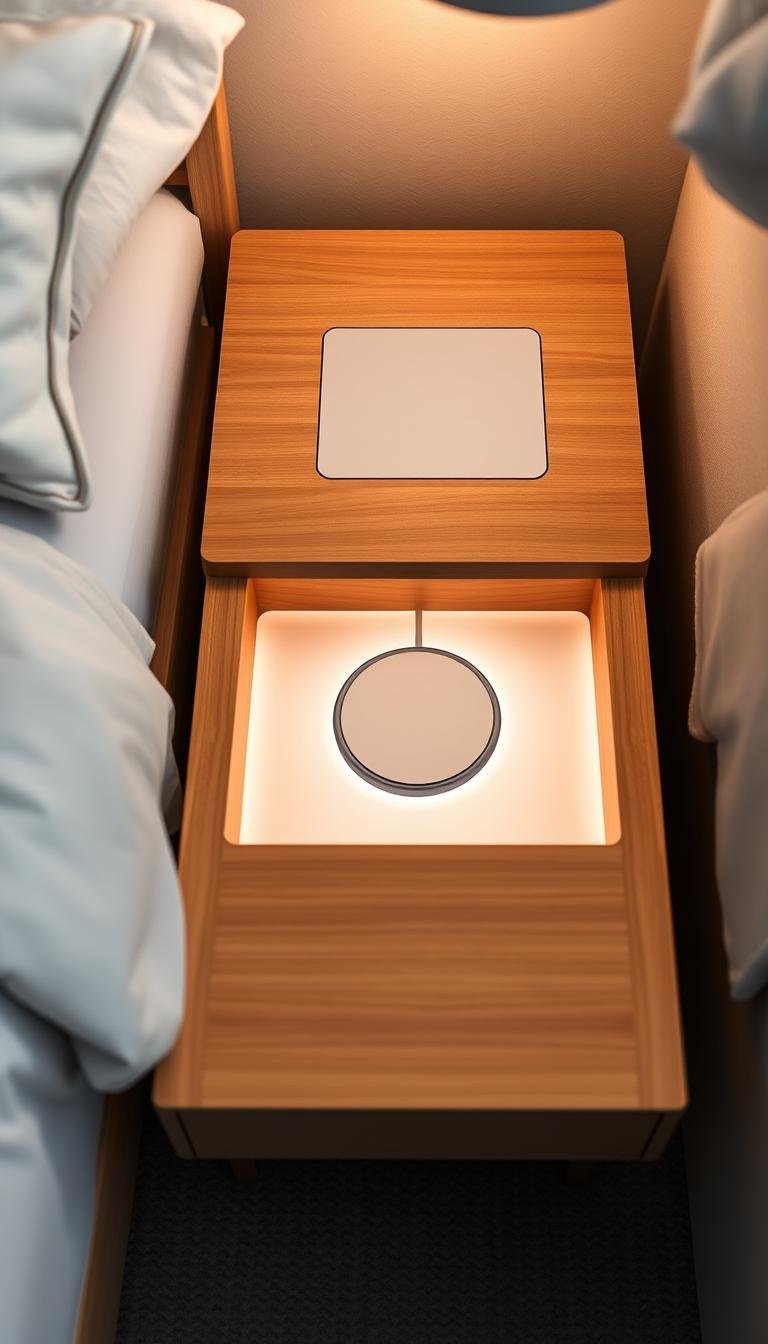
My plan was to make pass-through holes in the drawer and back, mount the power hub inside, and leave slack so cords move freely when the drawer opens. I used a longer cable for my phone near the bed and shorter cords for smaller gear to avoid tangles.
Safety mattered. I left clearance for bulky adapters, kept airflow through the hole, and turned the strip off when not in use. For thin backing, I cut a small square with a Dremel and taped the strip in place.
Key Takeaways
- Simple tools and a short parts list let you finish this project in an afternoon.
- Mount a surge-protected strip with Velcro and leave cord slack for smooth drawer action.
- Use longer phone cable by the bed and shorter cords for other devices to reduce tangles.
- Keep safety top of mind: airflow, quality strip, and turn power off when idle.
- Alternatives include flat-plug extensions, fabric-wrapped cords, or ready-made charging nightstands.
Why I built a hidden nightstand charging station (and what “easy” really looks like)
My bedside felt messy and chaotic until I converted the top drawer into a small power hub. I had multiple phones, an eReader, AirPods, and a fitness tracker fighting for one outlet. Sharing cords meant slow charging and constant swapping.

The fix was simple: drill a clean pass-through hole in the drawer and back, mount a compact surge-protected strip, and tuck devices into small bins. This kept the nightstand surface clear and helped me keep devices charged without fuss.
Easy meant using tools I already owned, keeping the project short in time, and avoiding complicated cuts or heavy sawdust. I aligned the drawer and nightstand holes so the cord moves freely and won’t snag or wear.
- I now leave one longer cord by my bed and shorter ones for rarely moved gear.
- The result: less visual clutter, faster charging, and a room that finally feels tidy at night.
For step photos and a full walkthrough, see my DIY charging station guide.
Supplies and prep: the simple kit I use for a nightstand charging station
Before any cutting, I laid out tools and cords to confirm fit and avoid surprises. This small dry run helped me pick the right pieces and decide where the pass-through would sit on the back panel.
My must-have tools:
- Cordless drill and a 1 3/8″ spade bit for a neat round pass-through.
- A compact power strip with surge protection (I prefer this over a basic strip for device safety).
- Velcro fasteners or heavy-duty tape, an extension with a flat plug if the outlet is awkward, plus the actual chargers and cables I’ll use.

Why surge protection matters: A surge-protected strip guards small devices from spikes. It doesn’t change how I plug in gear, but it adds peace of mind and avoids overloading circuits.
Hole sizing and prep tips: I used a 1 3/8″ spade bit so a standard plug passes through both the drawer and back. For thin fiberboard on the back, I switch to a Dremel and cut a small square to prevent tear-out.
I measure drawer travel and confirm each cord is long enough for movement. If a lead isn’t long enough, I plan an extension. Final step: mock up placement, attach the strip with Velcro, then test drawer action before finishing.
Step-by-step: drill a hole in the back, mount the power strip, and keep cords hidden
I planned drilling, mounting, and routing before I touched any tools. That short checklist kept the work tidy and fast.
Drill the pass-through. I mark the inside of the drawer and the back panel, then use a 1 3/8″ spade bit so the plug passes through easily. If the nightstand drawer can’t be removed, drill both pieces in place and match the two holes.
Align for smooth movement. I duplicate the hole on the back nightstand panel so the path lines up. This prevents chafing and gives the cord a straight, snag-free run when the drawer opens.

Mount the strip and route cords
I attach the power strip to the inside back of the drawer with Scotch Velcro or heavy-duty tape. I leave about two inches above it for bulky adapters and airflow.
Then I thread the strip cord through both holes, plug power strip into the outlet or an extension, and check drawer travel. I keep a little extra slack so cords don’t pull tight.
Dial in device placement
I place a long phone cable near the bed edge (I use a 6′ lead) and shorter leads for wearables. That setup limits tangles and makes grabbing a device easy.
- Confirm strip back drawer clearance so nothing binds.
- Secure the strip back so it won’t shift during use.
- Do a final test with everything charging to confirm safe power and heat dissipation.
What’s the easiest way to add a hidden charging station inside a nightstand? My organizing tweaks and safety checks
I started by dividing the drawer into clear zones so I could keep devices neat and grab them fast. Small shallow bins hold phones, earbuds, and chargers in their own spots. I label each bin and use a drawer liner to protect wood from heat or scratches.

Keep devices neat: bins, trays, and simple labels
I coil excess cord and tuck it under each bin so cords don’t drift. Labels help me know which cord charges which device, and that saves time every night. A few trays also stop items from sliding when I open or close the drawer.
Safety first: airflow, avoiding overloads, and switching off the strip when not in use
I use a surge-protected power hub rather than a bare strip. That gives me peace of mind for phone batteries and small chargers. I count chargers so I don’t overload the outlet and position the strip so the power strip back gets air through the pass-through hole.
I also check for warmth after long charges and switch the strip off when not in active use. Leaving breathing room around bulky adapters reduces heat build-up.
Smart alternatives: fabric-wrapped extension cords, wireless trays, or built-in charging nightstands
If hiding everything isn’t possible, I pick a fabric-wrapped extension with a flat plug and USB ports. For a tidy surface, a wireless charging tray or a lamp with a built-in pad works well.
| Option | Best use | Pros | Cons |
|---|---|---|---|
| Shallow bins + labels | Organizing multiple devices | Low cost, tidy | Needs occasional re-tidying |
| Surge-protected power strip | Powering chargers safely | Protects devices, allows multiple plugs | Requires space and airflow |
| Fabric-wrapped extension | When outlet layout is awkward | Attractive, flat plug options | Bricks may still show |
| Built-in charging nightstand | Plug-and-play solution | No drilling, integrated ports | Higher cost than DIY |
Troubleshooting and small upgrades that make a big difference
A few simple upgrades took my bedside power setup from finicky to foolproof. I list smart fixes I used when outlets weren’t where I wanted them and when bulky bricks crowded the inside.

No outlet behind the bed? Flat-plug, fabric-wrapped extension cords to the rescue
If there’s no outlet behind the bed, I run a flat-plug fabric-wrapped extension along the baseboard. It hugs the wall and stays low-profile while giving USB/USB-C ports that cut wall-wart clutter.
Tip: pick a color that matches trim so the cord blends in, and use an extension with a built-in breaker if you need more safety for plug power.
Thick plugs and adapters: leave clearance when mounting the strip back
When I mount the power strip inside, I leave about two inches of space so bulky plugs don’t bind the drawer. Test with your largest charger first to make sure it’s big enough and the back drawer still clears.
- I run the plug power strip connection low so it hugs the wall and won’t snag.
- I swap to right-angle USB-C or Lightning cord where space is tight.
- I coil excess cord neatly and clip it so visible runs stay tidy every time I open the nightstand.
Final check: confirm all plug power connections are firm, nothing warms under load, and your nightstands look as clean as they function after diy charging tweaks.
Conclusion
After a quick afternoon project, my drawer now hides power gear and keeps devices ready each night.
Final formula: drill aligned pass-throughs, mount a surge-protected strip with Velcro or tape, and route cords with slack. Place a longer phone cable by the bed and shorter leads for other gear for neat drawers and easy reach.
Safety matters: choose a quality power strip, allow airflow, avoid overloads, and switch the hub off when not charging overnight. Test and tweak placement until the drawer glides smoothly.
Whether you build this charging station, pick a piece of furniture with built-in ports, or use a wireless tray, the payoff is the same: less visual clutter, faster charging for all chargers and devices, and a small project that improves nightly routine.