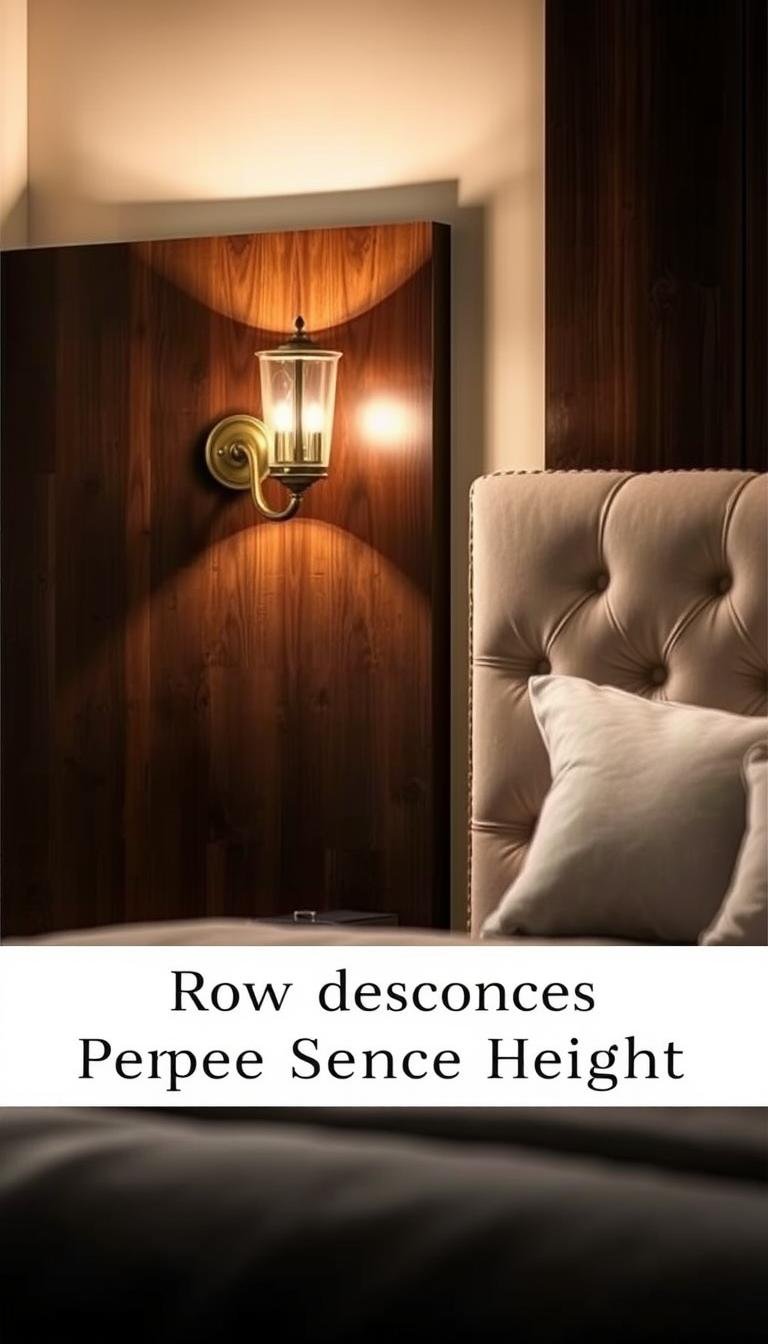
What’s the perfect sconce height beside a king headboard?
I often get asked how to place wall lighting so a bed area looks intentional and feels comfy. I start by measuring from the top of the dressed mattress, not the frame, since toppers and mattress depth change eye level.
For most king setups, I aim for about 24–30 inches above the mattress center. That works for reading without glare and keeps ambient glow pleasant.
I also translate that to floor numbers — roughly 55–65 inches to the fixture center — then fine-tune for a tall headboard or lots of pillows. Symmetry matters: matching sconces frame the headboard and lift the room’s look.
Choose directional shades if you read in bed, or diffused glass for soft light. Decide early on plug-in versus hardwired so the final fit matches your style and plans. I always test placement with tape or cardboard before drilling holes.
Key Takeaways
- Measure from the dressed mattress; mattress depth changes placement.
- Aim for 24–30 inches above mattress or 55–65 inches from the floor.
- Keep sconces symmetrical to frame the headboard and improve the look.
- Adjust for tall headboards, pillows, and whether you read in bed.
- Pick plug-in for flexibility or hardwired for a seamless finish.
- Test placement with painter’s tape or a template before installation.
Quick answer: the sweet-spot heights for bedside wall sconces next to a king bed
I keep bedside lighting simple: start from the top of the dressed mattress and use a common installer range. For most setups I center the fixture about 24–30 inches above that mattress top. That puts the light where you need it without glare.
If you prefer measuring to the floor, aim for about 55–65 inches to the fixture center. Then tweak the final position for tall pillows, a high headboard, or your seated eye line.
Side-to-side placement matters too. I place each sconce 6–12 inches in from the mattress or headboard edge so the beam falls over your shoulder for reading.

- Quick rule: center the fixture 24–30 inches above the mattress top.
- Or use 55–65 inches from the floor and adjust for posture.
- Pendants? Hang bottoms about 20–25 inches above the mattress for reach.
Start from the mattress top, tape mockups, sit and test before you drill. That simple routine nails sconce placement for most bedside lights.
What’s the perfect sconce height beside a king headboard? My pro guidelines for a king setup
I start every bedside lighting plan by using the top of the dressed mattress as my fixed reference. That gives a true working height once pillows and toppers are in place.
Start from the top of the dressed mattress, not the floor
Why this matters: mattress depth varies, so measuring here keeps light where you need it when you sit up to read.
Target ranges: 24–30 inches above mattress or 55–65 inches to center from floor
My rule of thumb is simple: aim for about 24–30 inches above the mattress or roughly 55–65 inches from the floor to the fixture center.

Adjust for tall headboards, thicker mattresses, and your seated eye level
I check seated eye level and place the lamp just above it so the beam lights a page without glaring. If pillows are high or the headboard is tall, I raise the fixture an inch or two.
“Measure twice, tape once: mock the placement, sit, read, and tweak before you drill.”
- Keep both wall sconces mirror-matched for balance.
- Mock up with tape to confirm reach and look.
| Reference | Inches Above Mattress | Inches From Floor (center) |
|---|---|---|
| Standard reading | 24–30 | 55–65 |
| Tall headboard / plush mattress | +1 to +3 | +1 to +3 |
| Ambient (softer) | Lower end of range | Lower end of range |
How I measure, mark, and test sconce placement before drilling
Before I drill any holes, I mock up the fixture so I can live with the look and feel. This saves patching and second guesses.
Tools I grab:
- tape measure and pencil for quick measurements
- painter’s tape and a cardboard template for an exact outline
- level so both sides line up and the wall looks tidy
I mark about 24–30 inches above the mattress top, then cross-check with a floor-to-center number. I tape the template on the wall so the full projection of the fixture is clear.

Find seated eye level and test
I sit in my usual reading posture to find true eye level. That helps limit glare and harsh shadows so the beam lands on the page, not my face.
- Make sure the switch or dimmer is reachable from bed.
- Test-read with the taped outline in place before drilling.
- Confirm both sconces mirror each other and use the level for final alignment.
“Mock, sit, tweak, then drill.”
| Step | Why it matters | Quick tip |
|---|---|---|
| Measure & mark | Sets initial reference | Use mattress top |
| Tape template | Shows projection and switch location | Live with it for a few minutes |
| Confirm studs | Ensures secure mount | Use anchors if needed |
Side-to-side placement beside a king: spacing, symmetry, and alignment
I set horizontal spacing first so lights sit where you reach comfortably from bed. Start by measuring 6–12 inches in from the mattress or headboard edge. That distance lets the beam fall over your shoulder for reading without crowding the nightstand.

Distance from mattress edge: the 6–12 inch rule
I usually use the middle of that range for standard nightstands. For swing-arm fixtures, I pull the sconce slightly inward so the arm can move without hitting trim.
Centering with nightstands and keeping both sconces even
Align each fixture with its nightstand so the wall composition feels intentional. Keep both sconces at the same height so your eye reads a clean line across the wall.
“Tape templates, stand back, then tweak until the room reads right.”
- I tape outlines at the chosen inches and live with the placement before drilling.
- I check shade projection and arm reach so nothing crowds the table or artwork.
- I use a level during mounting; even a quarter-inch shift shows on a wide bed.
| Issue | Quick fix | Result |
|---|---|---|
| Sconces too close to edge | Move 6–12 inches inward | Better beam on page, less clutter |
| Uneven mounting | Use level and measure from mattress top | Balanced wall composition |
| Swing-arm restricted | Shift fixture slightly inward | Full adjustability without bumping headboard |
Choosing the right fixture for function and style: reading vs ambient lighting
When I pick lights for a bedside wall, function guides style and vice versa. I decide first if task reading or soft mood is the priority, then match the fixture to that need.

Swing arms and directional heads for targeted beams
For focused reading, I choose swing-arm or directional-head fixtures so the beam lands on the page and stays just above your eye line. Adjustable arms make nightly reading comfortable without harsh glare.
Shade size, projection, and avoiding glare
I watch size and projection closely. Larger shades or long arms may need slightly more height so nothing bumps when you sit up. For ambient light, I prefer diffused bamboo or rattan shades to soften the glow.
Pendant alternatives and placement
Pendants clear bedside surfaces. I hang the bottom about 20–25 inches above the mattress and confirm the fixture’s adjustability and switch type before committing.
- I balance form and function by matching finish and style to the room design.
- I test for glare by sitting up and angling the light until my eye is comfortable.
- Pick plug-in for flexibility or hardwired for a clean, built-in look.
“Aim for adjustable fixtures when reading is key; choose diffused shades for softer ambient scenes.”
Mounting, wiring, and installation: plug-in vs hardwired on a king wall
I prefer to plan installation early so the final look is tidy and the wiring works with your bedroom needs.
When flexibility matters, I pick plug-in options. Plug-in wall lights install fast, let you reposition fixtures, and are renter-friendly. Cords hide behind paint-matched covers and run to a nearby outlet for a clean sightline that still stays reversible.
For a built-in finish, I recommend hardwired mounting. Hardwiring removes visible cords, ties into a wall dimmer, and gives a seamless wall composition. It usually needs a junction box cut into drywall and, in my experience, an electrician unless you’re comfortable with wiring.
Box height, studs, anchors, and dimmer reach
I set the electrical box to match the final center mark so the fixture backplate sits where we tested with tape. That usually lands in the 55–65 inch zone from floor, adjusted for mattress top.
Locate studs for secure mounting. If a stud isn’t available, use anchors rated for the fixture weight. Confirm dimmer or switch reach from the bed—on a wide mattress this matters more than you expect. Test wiring, polarity, and dimmer compatibility before final patching.

| Option | Pros | Cons |
|---|---|---|
| Plug-in | Fast installation; flexible placement; renter friendly | Visible cord unless concealed; may need outlet location |
| Hardwired | Seamless look; dimmer integration; no cord clutter | Requires drywall work; often needs electrician |
| Installation tips | Set box to tested center mark; use studs or rated anchors; test before final finish | Plan switch/dimmer reach; confirm backplate covers box fully |
“Mock placement, set the box to your mark, and test wiring before you finish the wall.”
- I choose plug-in when you want quick mounting and future options.
- I recommend hardwired when you want a clean, permanent finish that can tie into a dimmer.
- I always confirm that the fixture backplate covers the box and that mounting hardware matches the wall weight needs.
Common height mistakes I avoid around a king headboard
I watch for common mounting errors that spoil both function and look. Small missteps often lead to glare, odd shadows, or a pulled-apart wall composition.
Too high or too low. Mounting that misses your seated eye level either shines over your reading or into your eyes. I stick to the 24–30 inch rule above the mattress top, then test while seated.
Uneven spacing on either side. If one fixture sits closer or higher than its partner, the whole bed looks off. I measure distance from the mattress edge consistently so both fixtures align.
Too high, too low, or ignoring seated eye level and beam spread
I always check beam spread from my usual reading spot. This catches hot spots and harsh shadows before any drilling. If light hits the face, I raise or lower the fixture slightly and re-test.
Uneven spacing on either side of the bed breaks visual balance
I measure and tape both positions, then sit and read to confirm. I also make sure switches and dimmers are reachable from bed so nightly use stays effortless.

- I avoid mounts that leave the beam too distant or too blinding.
- I verify anchor choice or stud location for secure installation.
- I keep the electrical box centered so the backplate sits flush.
| Common Mistake | Quick Fix | Why it matters |
|---|---|---|
| Too high | Lower 1–3 inches after seated test | Restores focused beam for reading |
| Too low | Raise until glare clears eyes | Prevents eye strain and harsh shadows |
| Uneven sides | Measure from mattress edge to match distance | Keeps wall look balanced and intentional |
| Misaligned box | Re-center box or use larger backplate | Avoids awkward offsets during installation |
Conclusion
To wrap up, I want to leave you with a clear, repeatable plan for bedside lighting.
Start from mattress top and aim for about 24–30 inches above it, or check with a 55–65 inch floor-to-center read. Place fixtures 6–12 inches in from mattress edge so light falls over your shoulder. Test with tape, sit and read, then adjust.
Keep both sides even for a polished wall look. Choose plug-in for flexibility or hardwired for a clean, built-in finish. Also make sure wiring, anchor choice, and switch reach fit your room and style.
For more on pendant and bedside placement, see this pendant placement guide.