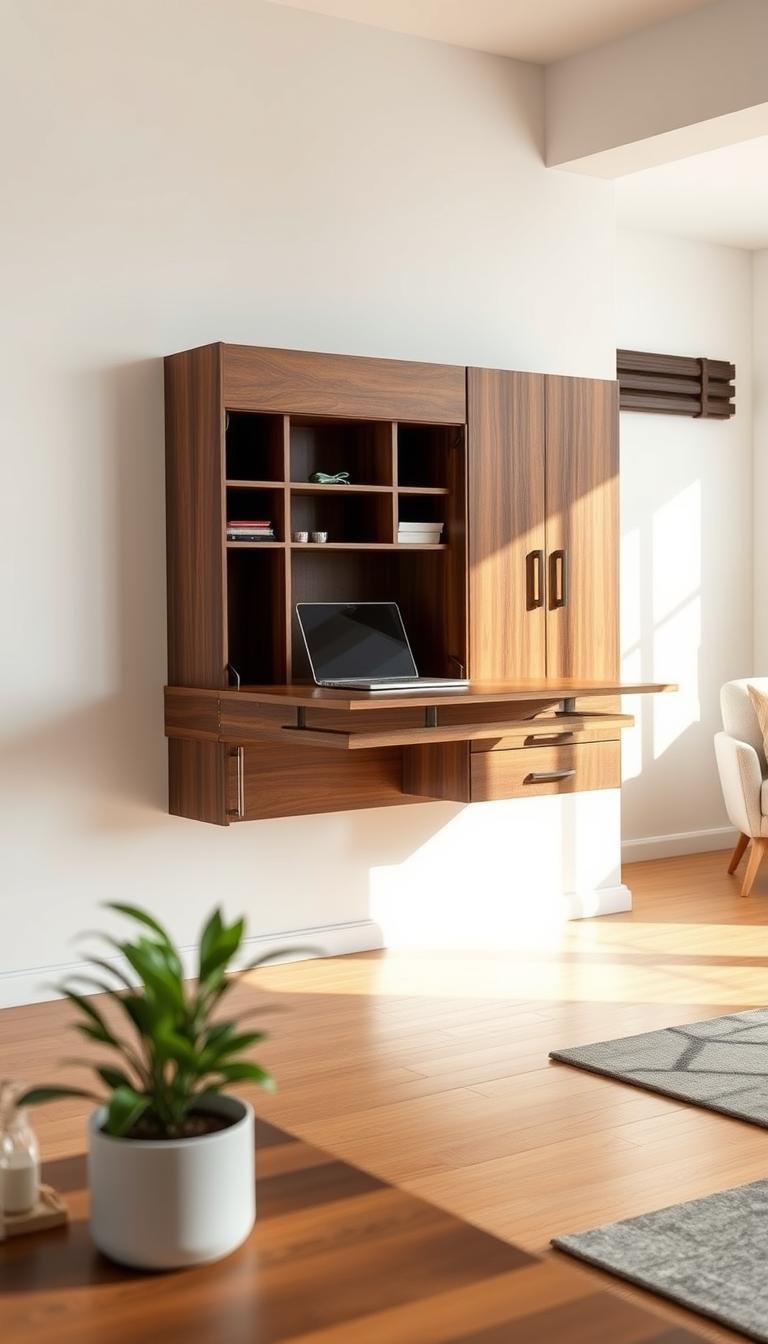
How can I make a DIY Murphy desk that looks like a piece of art?
Creating a beautiful wall-mounted desk is an exciting challenge. It combines practical furniture with artistic decor. I was inspired by Robert Van Embricq’s Flow Wall Desk. His work proves high-design pieces can be crafted with passion and effort.
I tackled this complex build myself. The satisfaction and sense of accomplishment were immense. Combining utility with aesthetics transforms any workspace. It also elevates your home’s interior design.
This guide will help you create your own masterpiece. With careful planning, professional results are achievable. Your finished project will be both sturdy and beautiful. Customize colors, finishes, and artistic touches to match your personal style.
Key Takeaways
- A Murphy desk saves space and adds artistic flair to any room.
- High-design furniture can be DIYed with dedication and the right guidance.
- Customization allows the desk to reflect your unique taste and home decor.
- Proper planning ensures a balance between structural integrity and visual appeal.
- The project offers great personal satisfaction and a functional, beautiful result.
- Using materials like plywood, molding, and quality hardware is key to success.
- Explore resources like DIY wall-mounted desk tutorials and home decor guides for more inspiration.
Why a Murphy Desk Can Be Both Functional and Artistic
Murphy desks offer the perfect marriage of practicality and beauty. They solve space challenges while adding visual appeal to any room. My own project transformed a cramped corner into a stylish workspace.
These space-saving wonders fold flush against the wall when not needed. This clever design maximizes your available floor area. Small apartments and home offices benefit tremendously from this feature.

The closed desk surface becomes a decorative canvas. I treated mine as a blank slate for creative expression. Custom paintings, wallpaper, or decorative molding can turn it into a focal point.
Integrating artistic details elevates ordinary furniture into statement pieces. Consider these transformative elements:
- Hand-painted designs or patterns
- Decorative hardware and unique pulls
- Contrasting finishes and stains
- Incorporated shelving for display items
Versatility remains one of the strongest advantages. The same unit functions as workspace, display area, and storage solution. This multi-purpose approach maximizes your investment.
Thoughtful material selection ensures both durability and beauty. I chose hardwood for strength and visual warmth. The right materials create furniture that lasts and delights.
My finished project became an immediate conversation starter. Guests often asked about the unique floating design. The combination of unexpected form and function captivated everyone.
This approach proves that utility never requires sacrificing aesthetics. Creative problem-solving yields solutions that please both eye and need. Every home deserves such thoughtful design elements.
Planning for multiple purposes enhances your results. Consider how the desk will serve different functions throughout the day. This foresight creates truly valuable furniture pieces.
| Functional Benefit | Artistic Opportunity | Space Impact |
|---|---|---|
| Folds against wall | Becomes decorative surface | Saves floor space |
| Provides work surface | Custom finish options | Defines room area |
| Offers storage | Display shelving integration | Reduces clutter |
| Supports organization | Hardware as decor | Creates visual order |
Well-executed Murphy desks demonstrate everyday items can become artistic statements. A bit of vision transforms basic furniture into personal expressions. The result serves practical needs while reflecting individual style.
Gathering Your Materials and Tools
The journey to creating a stunning wall-mounted workspace begins with careful material selection. Having everything ready before starting prevents frustrating mid-project delays. This preparation phase ensures a smooth building experience from start to finish.

Essential Wood and Hardware
Quality materials form the foundation of any furniture project. For the frame, I used thirty pieces of 3×3 squared wooden sticks. These create the structural skeleton that supports the entire unit.
The desktop surface required a substantial 3-inch thick rectangular plank. This provides the sturdy work surface needed for daily use. Choosing the right wood here is crucial for both appearance and durability.
Hardware components bring everything together securely:
- Heavy-duty hinges for the folding mechanism
- Various screws for different connection points
- A 1-meter metal pole for additional support
- String and pencil for accurate marking
These elements work together to create a reliable folding system. The hardware ensures smooth operation and long-term stability.
Specialty Tools You’ll Need
Certain tools make this project much easier to execute. A jigsaw proved essential for cutting curved shapes and precise angles. This allowed me to create the elegant contours that elevate the design.
The drill was indispensable for creating pilot holes and driving screws. Using the right drill bits prevents splitting the wood and ensures clean finishes.
My router added both functional and decorative elements. It created smooth edges and decorative grooves that enhanced the piece’s visual appeal. This tool truly bridges the gap between construction and artistry.
Other helpful tools included clamps for holding pieces during assembly. Measuring tapes and squares ensured everything remained perfectly aligned. Having these ready before starting saved considerable time and frustration.
Choosing Materials for Both Strength and Beauty
Material selection balances structural integrity with aesthetic appeal. I opted for select pine for its clean appearance and workability. This wood takes stains beautifully and offers excellent durability.
Reclaimed lumber presents another fantastic option. It adds character through natural weathering and unique grain patterns. Each piece tells its own story through knots and color variations.
Consider these factors when selecting materials:
- Weight capacity requirements for the desktop surface
- Visual harmony with your existing decor
- Ease of working with different wood types
- Environmental impact and sustainability
The back panel provides additional stability while offering decorative potential. I considered using mahogany veneer for its rich color and grain pattern. This elevates the piece from purely functional to truly artistic.
Each side element contributes to both form and function. Curved edges on the top portion prevent sharp corners while adding visual interest. These subtle details make a significant impact on the final appearance.
Planning finishes early influences material choices. Some woods accept certain stains better than others. Testing samples beforehand ensures you achieve the desired look without surprises.
My experience taught me that quality materials reward the extra investment. They work better during construction and maintain their beauty longer. This approach creates furniture that serves beautifully for years to come.
Step-by-Step Construction Process
Transforming raw materials into a functional wall-mounted workspace requires careful execution. Each phase builds upon the last to create a sturdy yet beautiful piece. My construction journey taught me valuable lessons about precision and patience.

Planning Your Design and Measurements
Proper planning prevents problems during assembly. I measured my wall space three times before making any cuts. This ensured the finished piece would fit perfectly in its intended location.
Creating a curved desk edge required creative thinking. I used a string and pencil as a makeshift compass. This simple technique drew a perfect semi-circle on the wood plank.
Marking stick placements needed mathematical precision. Starting at the semi-circle’s base, I placed two sticks first. Then came four poles spaced 3cm apart, followed by three groups at 2cm intervals.
The remaining sticks went 1cm apart toward the middle. Mirroring this pattern on the other side created perfect symmetry. This attention to detail made the folding mechanism work flawlessly.
Building the Desk Frame and Mechanism
Cutting all components required steady hands and sharp tools. My jigsaw made clean curves through the thick plank. Each wooden stick received identical treatment for consistency.
Labeling became my best friend during this phase. I marked every stick and corresponding plank section with letters. This simple system prevented confusion during reassembly.
Attaching the frame demanded precision drilling. I pre-drilled all holes to prevent splitting the wood. Using quality screws ensured strong connections that would last for years.
The folding mechanism needed particular attention. Installing hinges on both the plank and sticks created the downward folding action. Testing each hinge before moving forward saved me from rework later.
Installing the Hinges and Support System
Structural integrity depends on proper hardware installation. Cutting 4cm from the top of outer sticks created space for wall-mounting hinges. This adjustment allowed the unit to sit flush against the wall.
Adding string loops on the back of each stick provided support for the metal pole. These small details make a big difference in stability. The pole threads through these loops when the desk is in use.
Shaping the stick tops formed an elegant arch when open. This artistic touch elevated the piece from purely functional to visually striking. The curved shape also prevents sharp edges that could cause injury.
Drilling a handle hole in the plank completed the functional elements. This simple addition makes raising and lowering the surface much easier. It’s these thoughtful touches that transform basic furniture into something special.
The Assembly Process
Final assembly requires careful coordination and help from a friend. The weight of the unit makes solo installation dangerous. Having an extra pair of hands ensures safe and accurate mounting.
Anchoring into wall studs provides essential support. I used heavy-duty screws designed for substantial weight loads. This way the desk remains securely in place during daily use.
Threading the metal pole through the string loops completes the support system. This rod locks into place when the surface is horizontal. It provides additional stability that prevents sagging or wobbling.
Testing the folding action multiple times reveals any needed adjustments. I opened and closed the desk a dozen times before declaring it finished. This thorough testing ensures smooth operation for years to come.
The final result combines strength and beauty in one package. Following these steps creates furniture that serves practical needs while reflecting personal style. For more inspiration on creating functional art pieces, explore our design philosophy.
Transforming Your Desk into a Work of Art
The final phase brings your creation to life through artistic expression. This stage separates ordinary furniture from extraordinary statement pieces. My own transformation process revealed how finishes and details elevate basic construction.

Creative Design Elements and Finishes
Surface preparation creates the foundation for beautiful results. I sanded every inch thoroughly until smooth. Wood putty filled any gaps or imperfections perfectly.
A paint-primer combination provided excellent coverage. Rust-Oleum products created a clean, bright base. This approach saved time while ensuring professional-looking results.
The desktop received special attention for dual functionality. Chalkboard paint on the underside created a secret writing surface. This hidden feature adds playful practicality to the piece.
Incorporating Artistic Details and Personal Touches
Functional art elements make the desk uniquely yours. I affixed cork squares to the back panel using strong adhesive. This created an integrated bulletin board for notes and inspiration.
Geometric shapes added visual interest to plain surfaces. Trapezium-shaped wood pieces created striking patterns. Glue and nails secured these decorative elements firmly.
Personalization transforms generic furniture into meaningful art. Family motifs or favorite patterns make it truly special. These touches reflect your unique story and style.
Painting and Staining Techniques for Maximum Impact
Finishing techniques enhance both protection and beauty. A Danish oil mixture brought out the natural grain beautifully. The recipe combined equal parts boiled linseed oil, polyurethane, and mineral spirits.
Application requires flooding the surface then wiping excess. This method creates deep penetration and rich color. The oil protects while highlighting the wood’s character.
Final protection came from brush-on polyurethane. This top coat provides durable gloss and daily protection. Multiple thin coats ensure even coverage without drips.
For those seeking more inspiration, our design resources offer additional creative ideas. The right finishing touches elevate your project from functional to phenomenal.
Conclusion
Building this project brought immense pride and joy. The blend of hard work and creativity resulted in a functional art piece. It truly enhances any room.
Always prioritize safety, especially when mounting the heavy desk to the wall. Regular checks ensure the mechanism stays secure. Tighten hardware as needed.
Share your creation to inspire others. Consider adding a shelf or lighting later. These touches personalize it further.
The skills gained here build confidence for future diy projects. With patience, you craft beautiful, practical furniture. It transforms daily life in a meaningful way.