How can I add a pull-down spice rack above the stove?
Are you tired of digging through cluttered cabinets while cooking? I certainly was. My kitchen organization needed a serious upgrade, especially for my spice collection.
Traditional storage solutions just weren’t cutting it. Spices were scattered everywhere, making meal preparation frustrating and time-consuming. That’s when I discovered the perfect solution.
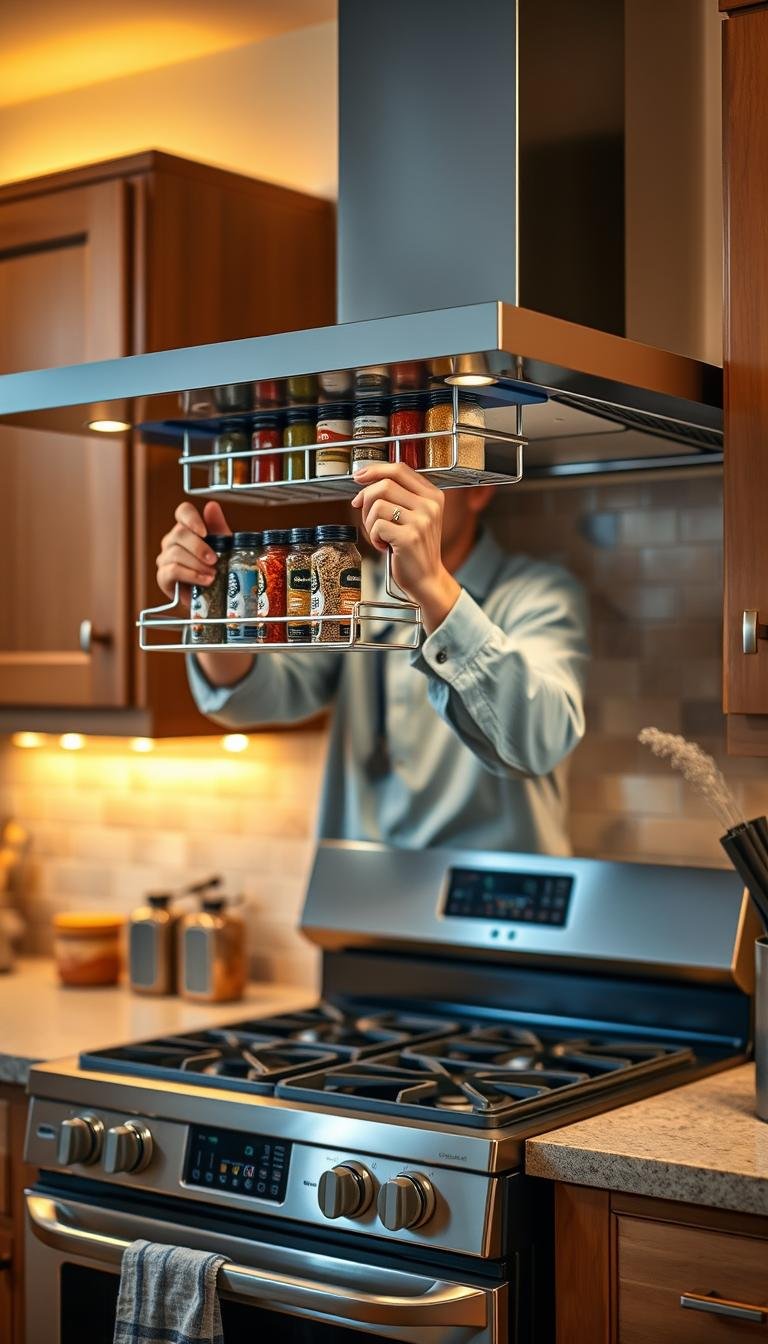
Creating a custom pull-down system above my stove transformed everything. This clever design keeps all my favorite seasonings within easy reach. No more searching through drawers or cabinets during crucial cooking moments.
The accessibility benefits are incredible. Everything stays organized and visible, saving precious time and reducing frustration. This project maximizes every inch of valuable kitchen space.
I’m excited to share my personal journey and practical advice. Let me walk you through the entire process from planning to installation.
Key Takeaways
- Traditional spice storage often creates kitchen clutter and frustration
- Pull-down systems provide exceptional accessibility above cooking areas
- Proper organization saves significant time during meal preparation
- Custom solutions maximize available kitchen space efficiently
- DIY projects can transform your cooking experience dramatically
- Having spices within easy reach improves workflow and enjoyment
Why I Love My Custom Pull-Down Spice Rack Solution
Finding the perfect storage system transformed my cooking experience completely. After years of frustration with standard options, I created something truly special.
This personalized approach keeps everything organized and accessible. The difference in my daily routine is absolutely remarkable.

The Problem With Traditional Vertical Organizers
Standard vertical organizers create serious visibility problems. You simply cannot see items on lower shelves without bending down.
This constant crouching becomes exhausting over time. People with back issues find this particularly challenging.
Many pre-made spice racks have stability concerns. Tall containers often tip over when drawers open quickly.
The side runners on these units are frequently too short. This creates wobbling and potential safety hazards.
Here’s how typical vertical organizers measure up against my solution:
| Feature | Traditional Racks | My Custom Design |
|---|---|---|
| Visibility | Poor lower shelf viewing | Perfect sight lines |
| Accessibility | Requires bending | Easy reach access |
| Stability | Items may tip over | Secure mounting |
| Space Efficiency | Wasted vertical space | Maximized storage |
| Daily Use Comfort | Strain on back | Natural movement |
Solving Accessibility and Space Challenges
My innovative design addresses all these concerns beautifully. Angled shelves provide excellent visibility for every container.
The smooth pull mechanism allows effortless access to all spices. No more straining or uncomfortable reaching during cooking.
This clever solution maximizes every inch of available kitchen space. The area above cooking surfaces becomes functional storage real estate.
After seven years of daily use, the system remains perfect. The design has proven itself through countless meal preparations.
Everything stays organized and immediately visible. This saves precious time and reduces cooking stress significantly.
The transformation in workflow efficiency is incredible. What was once a frustrating chore became an enjoyable experience.
Essential Tools and Materials You’ll Need
Selecting appropriate components is crucial for a functional storage system. The right materials ensure smooth operation and long-lasting durability. Quality components make all the difference in daily use.
Having everything prepared before starting saves time and frustration. This approach creates a more enjoyable building experience. Proper preparation leads to professional-looking results.

Measuring and Cutting Tools
Accurate measurements are essential for perfect fit. A quality tape measure provides precise dimensions. Digital calipers offer millimeter accuracy for critical joints.
Cutting tools should create clean, straight edges. A circular saw works well for larger panels. For intricate cuts, a jigsaw offers better control.
Safety equipment protects during construction. Safety glasses and gloves are non-negotiable. Hearing protection is wise when using power tools.
Hardware Components: Drawer Slides and Clips
The sliding mechanism forms the heart of this system. Heavy-duty drawer slides support significant weight capacity. Ball-bearing models provide smoother operation than basic models.
Special brass drawer clips enable the nested design. These clever components automatically extend the top drawer when opening the main unit. Lower compartments become accessible with a gentle pull action.
Mounting hardware secures everything safely. Sturdy screws anchor the frame to wall studs. Proper fasteners prevent any wobbling or instability.
Wood Materials and Finishing Supplies
Plywood offers excellent strength for the main structure. Half-inch thickness provides rigidity without excessive weight. Solid wood edges create a polished appearance.
Finishing materials protect and beautify the project. Sandpaper smooths all surfaces before finishing. Paint or stain matches existing kitchen decor.
Here’s a comparison of essential tool categories:
| Tool Category | Essential Items | Recommended Specifications |
|---|---|---|
| Measuring Tools | Tape measure, combination square | 25-foot tape, steel square |
| Cutting Equipment | Circular saw, jigsaw | 7-1/4″ blade, variable speed |
| Hardware Components | Drawer slides, brass clips | 100lb capacity, self-closing |
| Wood Materials | Plywood, solid wood trim | 1/2″ thickness, clear grade |
| Finishing Supplies | Sandpaper, primer, paint | 120-grit, oil-based primer |
Organization containers hold your seasonings neatly. Standard spice jars fit most commercial racks. Uniform containers create a clean, organized appearance.
The complete set of materials ensures project success. Each component plays a vital role in the final system. Quality materials reward you with years of reliable service.
Measuring Your Space: Getting the Dimensions Right
Proper measurement transforms any kitchen project from guesswork to precision. Getting dimensions accurate prevents frustrating mistakes later. This step ensures your storage solution fits perfectly from day one.

Assessing the Area Above Your Stove
Start by evaluating the available real estate carefully. Look at the vertical and horizontal measurements. Note any existing cabinetry or appliances that affect the space.
For narrow gaps beside appliances, think creatively. A 9-inch width next to an over-the-range microwave offers unique possibilities. This limited area demands smart vertical organization solutions.
Tall cabinets reaching the ceiling present special challenges. The top sections often become wasted space for daily-use items. Only the lower portions work well for frequently accessed containers.
Accounting for Clearance and Safety Considerations
Safety distances from heat sources are absolutely critical. Maintain proper clearance from the cooking surface below. This prevents any fire hazards or heat damage to your storage system.
Consider the swing radius of nearby cabinet doors. Ensure nothing interferes with appliance operation. These factors determine the final placement within your available area.
Electrical outlets and ventilation systems need attention too. Never block essential kitchen functions for storage. Always prioritize safety over convenience when planning.
Determining Optimal Height for Accessibility
User height dramatically impacts practical accessibility. For someone measuring 5’3″, the reach range differs significantly from taller users. The most comfortable zone sits between shoulder and waist level.
Test your natural arm extension before finalizing placement. Stand in your typical cooking position and reach upward. Notice where your hand falls comfortably without straining.
The lowest usable portion of tall cabinets works best for daily items. This area remains accessible without stools or tiptoes. Everything should be within easy grasp during meal preparation.
Here’s my proven measurement method for perfect results:
- Measure width, depth, and height of the available space
- Subtract safety clearances from all surrounding surfaces
- Mark the optimal height range based on user reach
- Verify mason jar dimensions if considering alternative storage
- Double-check all measurements before cutting any materials
This systematic approach eliminates costly errors. Your custom solution will fit perfectly and function flawlessly. Precise measurements create storage that feels like it was always meant to be there.
Designing Your Pull-Down Spice Rack System
Strategic arrangement considerations separate frustrating storage from brilliant solutions. The right layout turns unused space into your most valuable kitchen real estate. Thoughtful planning ensures everything works harmoniously for years of reliable service.

Choosing Between Single or Multi-Tier Design
Your available space and collection size determine the ideal configuration. Single drawer systems work well for smaller kitchens with limited spices. They offer simplicity and straightforward operation.
Multi-tier designs provide expanded capacity for serious cooks. My three-drawer system creates categorized storage based on frequency of use. This approach keeps everyday items immediately accessible while storing specialty seasonings conveniently.
Consider future needs when selecting your approach. Your system should accommodate collection growth and changing preferences. Flexible designs prevent needing complete replacements later.
Planning for Spice Jar Sizes and Organization
Container dimensions vary significantly between manufacturers and types. Measure your tallest and widest jars before finalizing shelf spacing. This prevents frustrating clearance issues after installation.
Standardization creates visual harmony and practical benefits. Uniform containers make everything fit perfectly and look organized. They also simplify labeling and identification during cooking.
Group items logically based on your cooking habits. Frequent-use seasonings deserve prime front-row positioning. Less common varieties can occupy secondary locations.
Incorporating Angled Shelves for Better Visibility
Traditional flat surfaces hide labels and create identification challenges. Angled presentation changes everything dramatically. You see every container’s contents without moving anything.
The slight tilt brings labels into perfect viewing position. No more guessing games about which jar contains which seasoning. This simple feature transforms your cooking experience completely.
My preferred angle ranges between 15 and 25 degrees. This provides excellent visibility while maintaining container security. Everything stays firmly in place during operation.
This innovative approach to kitchen organization creates both visual appeal and practical functionality. The nested drawer system I developed features three independent compartments within one main unit. The top section holds most-used items, while lower levels store specialty seasonings.
Key design considerations for optimal results:
- Evaluate your space constraints before committing to a specific layout
- Angled surfaces dramatically improve label visibility and access
- Plan for various container heights and diameters within your framework
- Multi-level systems require precise sliding mechanism coordination
- Consider visual balance with existing cabinetry and appliances
- Allow for future expansion or modification of your storage needs
The final configuration should feel intuitive and effortless to use. Every element works together to create seamless meal preparation. Your customized solution will become your favorite kitchen feature.
Building the Frame and Shelves
Constructing the structural elements forms the backbone of your entire organizational project. This phase transforms measurements and plans into tangible results. Proper execution here ensures years of reliable service.

Cutting and Assembling the Main Structure
Precision cutting creates components that fit perfectly in your space. I always double-check measurements before making any cuts. This prevents frustrating gaps or misalignments later.
The main frame requires careful assembly with quality materials. Half-inch plywood provides excellent strength without excessive weight. Solid wood edges create a polished finish that matches existing cabinet styles.
Each piece must align perfectly for smooth operation. I use clamps to hold everything in position during assembly. This ensures square corners and professional results.
Creating the Sliding Mechanism Framework
The sliding system demands special attention to detail. Heavy-duty drawer slides form the heart of the mechanism. These components support significant weight when filled with containers.
Proper mounting ensures everything operates smoothly. The base structure must accommodate the full set of mechanical components. Brass clips coordinate movement between nested compartments.
Test fit everything before final installation. This reveals any alignment issues with the guides or runners. Minor adjustments now prevent major problems later.
Installing Dividers and Angle Supports
Dividers organize contents within each compartment. They prevent jars from shifting during use. Strategic placement creates customized spaces for different container sizes.
Angled supports maintain the tilted shelf design. This crucial feature improves visibility dramatically. Everything remains visible without rearranging containers.
The side supports must be sturdy enough for daily use. They withstand the weight of full spice collections. Proper installation prevents any wobbling or instability.
This systematic approach to woodworking projects ensures professional results. Take your time with this foundational step. Quality construction rewards you with years of perfect operation.
Installing the Drawer Slides and Mechanism
Precision installation of moving parts ensures years of smooth operation. This phase transforms static storage into a functional, accessible system. Proper execution here makes all the difference in daily usability.

Selecting the Right Drawer Slides for Weight Capacity
Choosing appropriate hardware prevents future problems. Heavy-duty drawer slides should handle at least 25% more weight than your anticipated load. This safety margin accounts for full containers and occasional heavy items.
Ball-bearing models outperform basic slides for smooth operation. They provide consistent performance even with frequent use. Quality components reward you with reliable service year after year.
Mounting the Sliding System Securely
Proper alignment creates effortless movement. The mounting process demands careful attention to detail. Each set of guides must be perfectly level and parallel.
Brass drawer clips connect nested compartments beautifully. These clever components automatically extend the top section when opening the main unit. Lower drawer sections become accessible with a simple release mechanism.
Secure attachment to the cabinet framework prevents any wobbling. Sturdy screws anchor everything firmly in place. This stability ensures smooth operation during daily use.
Testing the Smooth Operation Before Final Installation
Multiple test runs reveal potential issues early. I always check the mechanism thoroughly before finalizing everything. This approach saves time and frustration later.
The entire system should operate quietly with minimal effort. Any sticking or catching indicates needed adjustments. Minor tweaks during testing prevent major problems after completion.
Well-installed components provide years of reliable service. A properly functioning mechanism extends the life of your storage solution. Everything works harmoniously for effortless access to all your kitchen essentials.
Mounting Your Spice Rack Above the Stove
Proper installation makes all the difference between a temporary solution and permanent kitchen upgrade. I approach this step with careful attention to safety and precision.
The right placement maximizes accessibility while maintaining essential clearances. Everything should feel natural and intuitive during cooking activities.

Finding and Marking Stud Locations
Locating wall studs is absolutely essential for secure mounting. I never rely on drywall anchors alone for weight-bearing installations.
My favorite method uses an electronic stud finder for accuracy. I always verify findings by tapping the wall and listening for solid sounds.
Once located, I mark each stud position clearly with painter’s tape. This creates visible guides for perfect hardware placement.
Securing the Rack to Wall Studs for Safety
Choosing appropriate hardware ensures long-term stability. I prefer heavy-duty screws that penetrate deeply into the wooden studs.
The mounting process begins with positioning the unit’s base against the wall. I ensure everything remains level before securing anything permanently.
Each connection point gets carefully aligned with my marked stud locations. The side brackets receive special attention for balanced support.
Ensuring Proper Clearance From the Stove Surface
Maintaining safe distances prevents heat damage and fire hazards. I always follow manufacturer recommendations for minimum clearances.
The bottom of the unit should never interfere with stove operation. Ample space allows heat to dissipate properly during cooking.
I verify clearance from the top of the range to the lowest point of my storage. This ensures safety while maximizing available vertical real estate.
Proper installation integrates seamlessly with existing cabinet configurations. The finished look should appear custom-built rather than added later.
Another cabinet might need slight adjustments for perfect alignment. Minor tweaks during installation create professional-looking results.
Organizing Your Spices Efficiently
Creating the perfect organizational system transforms how you interact with your kitchen daily. The right approach makes everything intuitive and effortless.
Smart categorization turns chaos into order. Everything becomes visible and accessible exactly when needed.

Categorizing by Frequency of Use
Your most-reached-for seasonings deserve prime positioning. I place everyday favorites in the top drawer for instant access.
Less common varieties occupy secondary locations. This logical grouping matches your actual cooking patterns.
Specialty items that see occasional use go in lower sections. They remain available without cluttering prime real estate.
Choosing the Right Containers
Uniform spice jars create visual harmony and practical benefits. Everything fits perfectly within the allocated storage space.
Opaque materials protect contents from light exposure. This preserves flavor and potency longer.
Standardized containers simplify organization dramatically. You can easily see when supplies run low.
Labeling Systems for Quick Identification
Clear identification prevents cooking interruptions. Consistent labeling makes everything instantly recognizable.
Angled shelves display labels beautifully without jar removal. This brilliant feature saves precious time during meal preparation.
Color-coded systems work wonderfully for visual learners. They create additional organizational layers beyond text.
“The difference between chaos and order often comes down to thoughtful categorization. Grouping by frequency of use transformed my cooking experience.”
My personal approach involves these key principles:
- Position frequently used items at eye level for effortless access
- Maintain uniform container sizes for space efficiency
- Use clear, consistent labeling for instant identification
- Group by cuisine type or flavor profile for logical organization
- Rotate seasonal items based on current cooking habits
This systematic approach to spice organization creates both visual appeal and practical functionality. The complete set of organizational strategies works together seamlessly.
Proper arrangement makes cooking more enjoyable and efficient. You’ll spend less time searching and more time creating delicious meals.
Alternative Uses for Narrow Kitchen Spaces
Sometimes the perfect organizational solution requires thinking beyond traditional approaches. Not every awkward gap demands the same storage strategy.
Creative alternatives can transform challenging areas into functional assets. The key lies in matching the space with your specific needs.

When a Spice Rack Might Not Be the Best Solution
Very narrow gaps present unique organizational challenges. A nine-inch width beside appliances often works better for different purposes.
Consider what you actually need to store most frequently. Sometimes vertical storage for baking sheets makes more sense than spice containers.
Tall upper cabinets often become wasted real estate. These areas suit less frequently used items better than daily essentials.
Other Storage Ideas for Awkward Spaces
Specialized utensil storage transforms narrow gaps into functional zones. Magnetic strips or custom dividers maximize every inch.
Recipe book organization creates accessible cooking references. Slim vertical holders keep favorite recipes within easy reach.
Vertical dividers work wonderfully for cutting boards and trays. This approach utilizes height rather than width efficiently.
Considering Mason Jar Storage Options
Mason jars offer versatile storage solutions for various kitchen needs. They work perfectly for dry goods, spices, or baking supplies.
Uniform containers create visual harmony in tight spaces. Their standardized sizes make organization straightforward and efficient.
Consider whether you’re dealing with depth limitations or width constraints. Mason jars might fit where traditional racks won’t work properly.
My favorite alternative uses for challenging areas:
- Vertical baking sheet organizers in slim gaps between appliances
- Magnetic spice containers on the side of metal cabinets
- Narrow pull-out shelves for canned goods or oils
- Custom dividers for cutting boards and serving trays
- Vertical recipe book holders beside the cooking area
- Specialized utensil storage on the cabinet door interior
The goal remains maximizing functionality while maintaining aesthetic appeal. Sometimes the best solution isn’t obvious until you consider all options.
Conclusion
The true test of any diy project comes through years of practical use. My custom creation has performed flawlessly for seven years without needing changes.
This smart design provides excellent visibility and easy access. Everything stays organized right where I use it most.
Quality materials and proper planning ensure your spice rack stands the test of time. Custom solutions often outperform store-bought options.
The satisfaction of building something functional for your home is incredibly rewarding. Your organized kitchen awaits!
Happy building – may your cooking experience become more enjoyable and efficient.