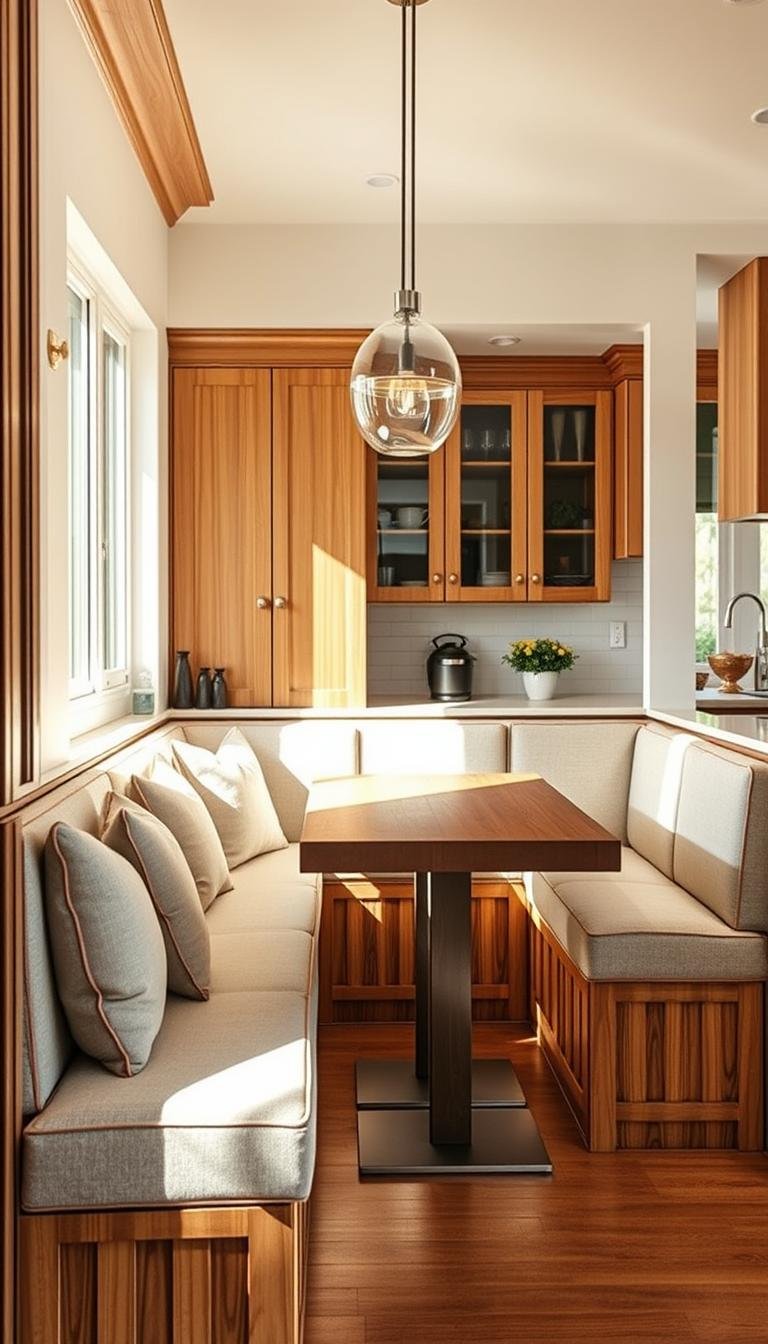
What’s the perfect depth for built-in banquette seating with storage?
Creating cozy banquette seating transforms any dining space into a welcoming nook. The right dimensions make all the difference between comfort and cramped quarters. I want to help you design a spot that feels just right.
Getting your measurements correct ensures both relaxation and functionality. A well-planned bench provides excellent support while maximizing your room’s potential. It also offers clever hidden storage solutions for your home.
Through this guide, I’ll share expert tips on achieving the perfect fit. We’ll explore how cushion thickness and backrest angles influence your final design. You’ll learn to create a beautiful, practical addition to your living area.
Key Takeaways
- Proper depth ensures both comfort and functionality in your seating area
- The right measurements maximize space efficiency in dining rooms
- Cushion thickness significantly impacts your final depth requirements
- Built-in storage options affect your overall design dimensions
- Expert recommendations help balance depth with other measurements
- Real-world examples demonstrate successful banquette installations
- Accurate measuring leads to ideal proportions for your specific space
Understanding the Perfect Depth for Your Banquette Seating
Getting your bench dimensions right transforms ordinary dining into extraordinary experiences. I’ve seen how proper measurements create inviting spaces where people naturally gather.

The right proportions make all the difference between feeling cramped and enjoying relaxed comfort. Your bench should welcome guests without swallowing precious floor space.
Why Depth Matters for Comfort and Functionality
Bench depth serves as the foundation for enjoyable meals and conversations. Too shallow, and you’ll feel perched uncomfortably. Too deep, and reaching your table becomes a stretch.
Interior designer Jono Fleming perfectly captures this balance:
“The seat needs to be deep enough to sit comfortably, but not so deep that you feel too far from the table. Making sure there’s enough space to slide in and out easily is important too — you don’t want to feel boxed in or have to shuffle awkwardly to get up.”
This principle applies especially when incorporating storage beneath your seating. Functional compartments shouldn’t compromise sitting comfort.
The Goldilocks Principle: Not Too Deep, Not Too Shallow
Finding that “just right” measurement creates magical dining experiences. It’s why restaurants use banquettes – they encourage lingering over meals.
According to bench seating experts, your dimensions should mimic ordinary chairs. Typical chair depth ranges from 18 to 24 inches.
Consider these real-world depth comparisons:
| Depth Measurement | Comfort Level | Best For |
|---|---|---|
| 16-18 inches | Somewhat cramped | Small spaces without cushions |
| 19-21 inches | Comfortable standard | Most dining situations |
| 22-24 inches | Very relaxed | Thick cushions or lounging |
Deeper benches may challenge those with mobility concerns. The ease of sliding in and out matters greatly for daily use.
Your backrest angle and cushion thickness work with depth to create optimal comfort. These elements combine to make your dining area both beautiful and practical.
Key Measurements for Optimal Banquette Design
Accurate dimension planning separates ordinary seating from extraordinary comfort. I’ve learned that getting these numbers right makes your dining nook both beautiful and practical.

Standard Depth Recommendations from Design Experts
Professional designers consistently recommend specific measurements for comfortable built-in seating. Interior expert Jono Fleming created a successful design using 45cm (approximately 18 inches) for the main sitting area.
This measurement comfortably accommodates five people while allowing easy access to the dining table. The backrest in his design adds another 10cm, enhancing comfort without compromising space efficiency.
Most experts suggest keeping your main sitting area between 16-18 inches. This range works well for average-sized adults and standard table configurations. The height typically falls between 17-20 inches for optimal comfort.
How Cushion Thickness Affects Your Depth Calculations
Cushion materials significantly impact your final measurements. Thicker padding may require a shallower base structure to maintain proper proportions.
You need to account for both the structural framework and the finished appearance. Denser foam compresses differently than softer materials, changing how the seat feels during use.
Different cushion densities create varying perceptions of comfort and space. Firm high-density foam maintains its shape better over time but feels different than plush alternatives.
Measure carefully, considering any decorative elements or overhangs. These small details can affect how people experience your final design.
Adjust your plans based on your household’s specific needs and available space. All these elements work together to create harmonious, functional dining areas that families enjoy for years.
Space Planning: How Much Room Do You Really Need?
Smart space planning transforms your dining area from functional to fabulous. I’ve helped countless homeowners create cozy nooks that maximize every inch while maintaining comfort.
Proper measurements ensure your bench seating feels inviting rather than cramped. The right proportions make all the difference between a space you love and one that feels awkward.

Minimum Wall Space Requirements Per Person
Designer Jono Fleming offers clear guidance on personal space needs. He recommends allowing 80cm of wall length per person for comfortable bench seating.
This measurement ensures everyone has enough room to sit comfortably without crowding one another. It accounts for shoulder space and allows for natural movement during meals.
For a family of four, you’d need approximately 3.2 meters of wall space. Always add extra inches if you want occasional guest seating.
Corner vs. Single Wall Configurations
Corner setups work beautifully for larger seating areas. They typically accommodate four or more people while creating an intimate dining nook.
Single wall installations offer flexibility in smaller spaces. They can be just as functional when planned with proper proportions.
Corner designs often require different depth calculations than straight installations. The angle affects how people sit and interact with the table.
Consider your table shape when choosing between configurations. Round tables pair well with corner benches, while rectangular tables often work better against single walls.
Measure your available space carefully before deciding on a configuration. Mark the area with painter’s tape to visualize how much room the bench will occupy.
Remember to account for table clearance and walking paths. A well-planned dining area balances seating comfort with overall room flow.
For more inspiration on space-efficient designs, explore creative solutions at Dwelanor’s home design resources.
Seat Height and Depth: Finding the Right Balance
Getting these two measurements working together creates that magical sweet spot where comfort meets functionality. I’ve discovered that when height and depth harmonize, your dining experience transforms completely.

The relationship between these dimensions determines whether you feel relaxed or restricted. Proper proportions prevent that awkward perched feeling or struggling to reach your plate.
Ideal Seat Height Range (17-20 Inches)
Most comfortable bench designs fall within the 17-20 inch range for seat height. This measurement coordinates perfectly with standard dining tables standing 28-30 inches tall.
That 10-12 inch difference provides ideal leg clearance and comfortable sitting posture. Higher seats may make the depth feel shallower than actual measurements show.
I always recommend testing different heights before finalizing your design. Use temporary platforms to simulate various height options in your space.
Coordinating Seat Depth with Your Dining Table
Your table dimensions directly influence how you experience the bench depth. Standard 18-inch depths work well with most dining table configurations.
Custom or non-standard tables require careful measurement adjustments. Deeper tables might need slightly reduced seat depth for comfortable reach.
Consider this practical advice from experienced designers:
“Measure twice, cut once. Test your planned height and depth with temporary seating before building anything permanent. Your body will tell you what feels right better than any measurement guide.”
Remember to account for cushion compression when calculating final dimensions. Thicker padding might require slight adjustments to your planned measurements.
These elements work together to create a harmonious dining experience. The right balance makes every meal feel like a special occasion in your home.
Backrest Considerations for Maximum Comfort
The right back support transforms your dining experience from ordinary to extraordinary. I’ve discovered that proper backrest design makes people linger longer at meals and enjoy deeper conversations.

Angled vs. Straight Back Designs
Angled backrests create superior comfort compared to straight designs. Most experts recommend 100-110 degrees for optimal relaxation.
The ideal angle falls around 105 degrees according to DIY guides. This slight recline supports your spine naturally without pushing you too far from the table.
Straight backs work better for formal dining situations where upright posture matters. They save space but sacrifice some comfort for compact installations.
How Backrests Add to Overall Depth
Backrests significantly increase your total depth requirements. Designer Jono Fleming’s project added 10cm (4 inches) to the overall dimensions.
This additional space affects how you interact with your dining table. You’ll need to account for both the structural framework and cushion thickness.
Different materials change the final measurements. Wood frames add less bulk than upholstered pieces with dense foam padding.
Jono shared a brilliant budget-friendly hack using pool noodles for comfortable back support. This innovative approach creates cozy backrests without professional upholstery costs.
Consider your available space when choosing between built-in and separate cushion backrests. Built-in options provide cleaner lines but require more permanent depth commitments.
Adjust your plans based on backrest height and construction methods. These elements work together to create harmonious proportions that enhance your dining experience.
DIY vs. Professional Construction: What’s Right for You?
Choosing between tackling this project yourself or hiring help is a big decision. I’ve seen both approaches create beautiful results when planned properly.
Your choice affects everything from budget to final appearance. Consider your skills, available time, and desired finish quality before deciding.

The DIY Approach: Pre-made Bases and Custom Cushions
Many homeowners successfully create their own bench seating using pre-made options. This way saves money while allowing personal customization.
Designer Jono Fleming demonstrated an innovative method using simple tools. His approach involved a staple gun for fabric wrapping and creative solutions like pool noodles for backrest support.
You’ll need basic tools and some patience for this building method. The process typically involves:
- Selecting pre-fabricated bench base units
- Having foam cushions cut to exact dimensions
- Wrapping and securing fabric with a staple gun
- Adding creative comfort elements like pool noodle supports
This approach keeps costs around a few hundred dollars. It works well for those comfortable with basic tools and measurements.
When to Hire a Professional Joiner or Cabinetmaker
Sometimes bringing in experts makes more sense for your situation. Custom work ensures perfect fit and finish for challenging spaces.
Professional construction typically involves two specialists. A joiner handles the structural base while an upholsterer creates custom cushions.
Consider this professional route when:
- Your space has unusual angles or constraints
- You want built-in storage with complex access
- Time is limited and you need guaranteed results
- Your vision requires specialized woodworking skills
This way costs significantly more, often reaching thousands of dollars. The investment brings expert craftsmanship and peace of mind.
Your choice between DIY and professional help affects depth considerations. Custom work offers more flexibility with measurements than pre-made options.
Evaluate your skills honestly before committing to either approach. Both methods can create beautiful, functional seating when executed properly.
Creative Material and Fabric Choices
Your selection of materials transforms ordinary bench seating into a personalized retreat. I’ve discovered that smart fabric choices elevate both appearance and daily functionality.
These decisions impact maintenance, durability, and overall comfort levels. The right textiles make cleaning spills simple while maintaining their beautiful appearance.

Stain-Resistant Fabrics for Longevity
Designer Jono Fleming recommends specific fabrics that withstand daily use beautifully. His top choices include linen blends, leather, and vinyl for exceptional durability.
These stain-resistant options handle spills and messes with minimal effort. They maintain their appearance through years of family meals and gatherings.
Consider this practical advice from experienced designers:
“Choose textiles that clean easily and resist staining. Your dining nook should welcome life’s messy moments without causing stress about fabric damage.”
Different material thicknesses affect perceived comfort and space. Thicker cushions might make seating feel more luxurious but require adjusted measurements.
Your project benefits from materials that coordinate with existing decor. Select colors and textures that complement your room’s overall aesthetic.
Budget-Friendly Hacks Like Pool Noodle Backrests
Creative solutions deliver custom looks without premium prices. Jono Fleming’s brilliant pool noodles technique demonstrates innovative thinking.
This budget-friendly approach involves wrapping noodles in wadding and fabric. The result creates structured, rounded backrests at a fraction of professional costs.
This clever way achieves polished results using simple materials. You can create comfortable support without specialized tools or skills.
For more inspiration on affordable design solutions, explore creative ideas at The Design Files’ banquette guide.
Your project can incorporate these smart hacks to save money. The savings allow investment in higher-quality fabrics or additional features.
Even a bit of creativity goes a long way in customizing your space. These approaches make luxury-feeling results accessible for various budgets.
Remember that material choices impact both initial costs and long-term maintenance. Smart selections balance immediate expenses with future cleaning and replacement needs.
Incorporating Storage into Your Banquette Design
Smart storage integration turns ordinary seating into multifunctional marvels. I’ve helped homeowners transform their dining areas with clever hidden compartments that maintain comfort while adding utility.

Hidden Storage Solutions for Various Needs
Built-in compartments offer brilliant ways to organize household items. Designer Jono Fleming recommends storing laptop cords, textbooks, and tablecloths in these spaces.
Toys and cleaning supplies also fit perfectly within these clever areas. The right approach keeps everything tidy yet easily accessible.
Different storage methods work better for specific items:
| Storage Type | Best For | Space Efficiency |
|---|---|---|
| Lift-up seats | Bulky items, seasonal decor | Excellent for deep storage |
| Front drawers | Frequently used objects | Good for shallow items |
| Side panels | Long, narrow possessions | Perfect for awkward shapes |
Your base design should accommodate these different systems. Consider what you need to store before choosing your solution.
Access Considerations for Storage Compartments
Easy entry makes your storage practical rather than frustrating. I always recommend testing access points before finalizing designs.
Lift-up seats work beautifully for larger compartments. They provide full access to the entire storage area beneath.
Front drawers offer convenient reach without moving cushions. This way keeps everything within easy grasp during daily use.
Side access panels work well for corner configurations. They maximize space while maintaining clean lines.
Hardware selection impacts functionality and appearance. Soft-close hinges prevent slammed lids and protect fingers.
Consider this practical advice:
“Plan your access based on what you’ll store and how often you’ll need it. Frequently used items deserve easier reach than seasonal decorations.”
Your home benefits from thoughtful placement of these features. The right approach keeps your space organized and beautiful.
Remember to account for clearance when opening compartments. Doors and lids need space to operate smoothly without hitting walls or tables.
These elements combine to create storage that enhances rather than compromises your seating area. Smart planning ensures both comfort and functionality coexist perfectly.
Electrical and Lighting Considerations
Planning your power and illumination transforms a simple bench into a fully functional dining area. I’ve seen how proper electrical integration makes spaces more usable and inviting for daily life.
Smart planning ensures your nook serves multiple purposes beautifully. You’ll create a spot that works for meals, work, and relaxation.

“The right lighting makes a huge difference. A pendant or wall sconce helps define the nook.”
His insight highlights how illumination creates atmosphere and function. Proper planning should happen before finishing your backrest for best results.
Adding Outlets for Convenience
Built-in power access makes your space incredibly practical. I recommend installing outlets in end caps or side panels for device charging.
This approach keeps cords tidy and accessible. You’ll appreciate having power nearby for phones or laptops during meals.
Consider these placement options for maximum convenience:
| Outlet Location | Best Use | Installation Complexity |
|---|---|---|
| End caps | Device charging | Moderate |
| Side panels | Lamp connections | Easy |
| Under seat | Hidden access | Difficult |
Always hire a licensed electrician for this work. Safety matters most when dealing with household power systems.
Plan these features during construction rather than adding later. Retrofit installations often cost more and look less seamless.
Lighting That Defines Your Dining Nook
Proper illumination transforms functional areas into destination spots. The right fixtures create warmth and atmosphere in your home.
Pendant lights work beautifully over corner configurations. They provide focused light for meals and conversations.
Wall sconces offer excellent ambient lighting solutions. They save space while adding decorative elements to your design.
Integrated LED strips create modern, subtle illumination. These work well under seats or along backrests for soft glow effects.
Lighting affects how people perceive space and proportions. Well-placed fixtures make areas feel larger and more inviting.
Choose bulbs with warm color temperatures for dining areas. These create cozy atmospheres perfect for meals and gatherings.
Your lighting choices should complement other design elements. Coordinated fixtures pull everything together beautifully.
Remember to consider switch placement during planning. Easy access makes using your lighting system simple and intuitive.
With proper electrical and lighting planning, you’ll create a space that’s both beautiful and highly functional for years of enjoyment.
Step-by-Step Construction Overview
Building your own comfortable nook requires careful planning and execution. I’ll guide you through each phase of this rewarding project.
Proper construction techniques ensure your bench lasts for years. Following these steps helps avoid common mistakes.

Building the Base and Framework
Start with a solid foundation using quality materials. I recommend ¾” plywood for the main seating platform.
The framework provides essential support for daily use. Use ½” plywood for vertical ribs and structural elements.
Level everything carefully during assembly. This ensures comfort and prevents awkward sitting positions.
Consider this expert advice for stable construction:
“Always check for level and square at every stage. A crooked base leads to uncomfortable seating and fitting issues later.”
Installing the Seat and Backrest Structure
The seat platform needs secure attachment to the wall studs. Use appropriate hardware for your wall type.
Build the backrest structure with comfort angles in mind. Most designs work best with a slight 5-10 degree lean.
Maintain consistent measurements throughout assembly. This preserves your planned depth and height dimensions.
Double-check all connections before moving forward. Loose joints can cause squeaking or instability over time.
Finishing Touches: Trim and Paint
Quality trim work hides seams and creates polished edges. Use wood filler for any visible gaps or imperfections.
Sanding creates a smooth surface for paint or stain. Start with coarse grit and progress to finer papers.
Priming ensures even coverage and better adhesion. Apply two thin coats rather than one thick layer.
Caulking along edges gives a professional finish. This small detail makes a big difference in appearance.
Consider these material options for your project:
| Material Type | Best Use | Durability |
|---|---|---|
| ¾” Plywood | Seat platform | Excellent |
| ½” Plywood | Structural ribs | Good |
| Pine trim | Edge finishing | Moderate |
| MDF | Painted surfaces | Good |
This way of building ensures beautiful results. Your completed base will provide comfortable support for years.
Take your time with each phase of the project. Rushing leads to mistakes that affect both function and appearance.
Conclusion: Creating Your Perfect Banquette Space
Designing a cozy nook transforms how you experience meals and gatherings. I believe careful planning makes your spot both beautiful and practical.
Jono Fleming shared wonderful insight about these projects. He noted that with thoughtful details, your bench becomes a destination rather than just furniture.
All elements work together for maximum comfort and function. Your careful measurements ensure years of enjoyment in your home.
Feel confident starting your project. You now understand how each choice affects the final result.
Personal touches make the space truly yours. Enjoy creating a spot where memories will happen for years to come.