What’s the easiest way to add a pull-out pantry next to the fridge?
My kitchen always felt cluttered. I struggled with limited storage space for dry goods and spices. That narrow gap beside my fridge was just collecting dust.
I knew there had to be a better solution. After some research, I found a brilliant idea. Installing a pull-out pantry transformed my entire kitchen organization.
This project turned wasted space into valuable storage. It made my daily routine smoother and my home feel more organized. Best of all, it was surprisingly simple to achieve.
Many homeowners face this common problem. I want to share my journey and show you how manageable this upgrade can be. Let me walk you through my step-by-step approach.
Key Takeaways
- Maximize unused space beside your refrigerator for extra storage
- Create a custom pull-out pantry system using existing kitchen cabinets
- Improve kitchen workflow with smarter organization solutions
- Transform cluttered areas into functional storage spaces
- Complete this project with basic DIY skills and tools
- Adapt this idea to fit various kitchen layouts and sizes
- Enjoy better organization and easier access to pantry items
Why I Decided to Build a Pull-Out Pantry Next to My Fridge
Every kitchen I’ve ever owned presented unique storage challenges that demanded creative solutions. Like many homeowners, I struggled with finding adequate room for dry goods and cooking essentials. That narrow gap beside my refrigerator became my inspiration for change.
I recall reading something that perfectly captured my experience:
“Without fail, in each and every house we move in to, there is always one specific space that requires a complete re-imagination from what we were doing before: the pantry. In the 8 homes we’ve lived in, we have not once had a ‘similar’ pantry layout”
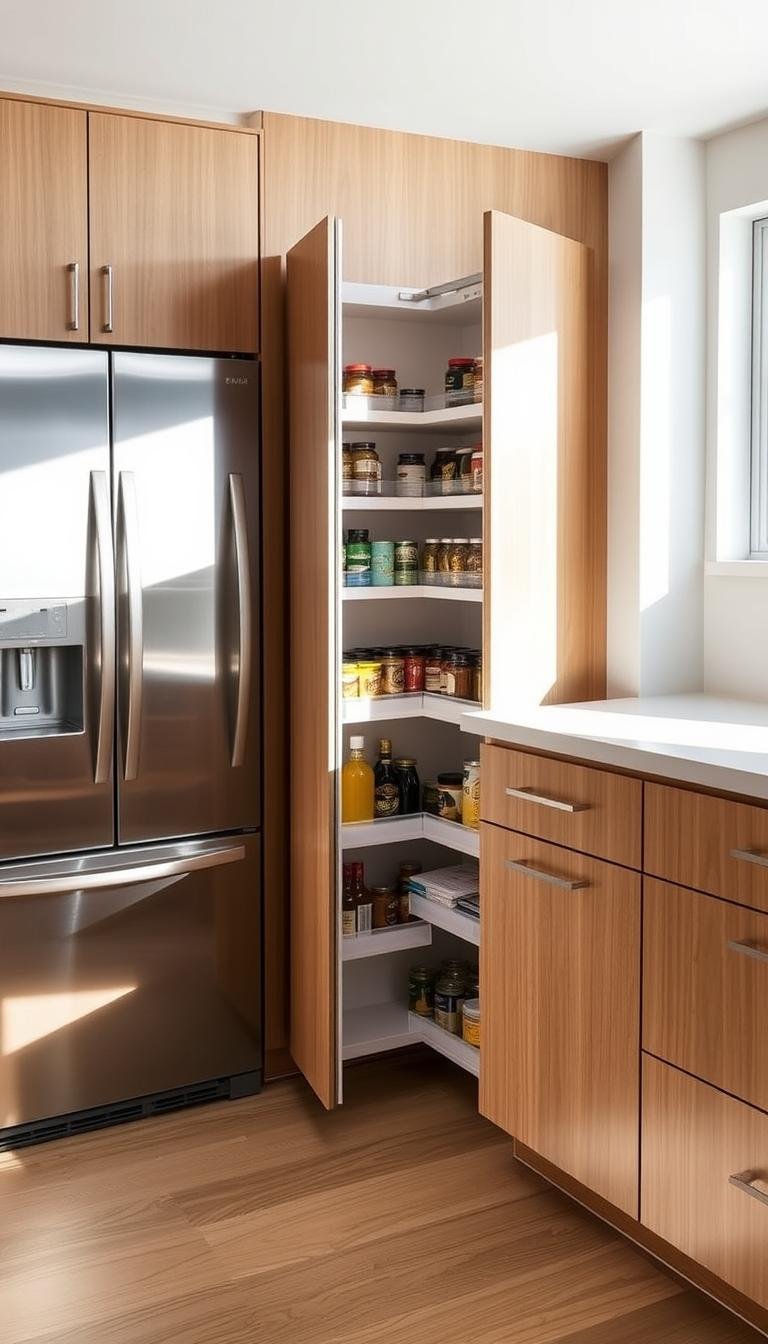
The Space Problem in My Kitchen
My kitchen cabinets were bursting at the seams. Canned goods competed with spices for limited shelf real estate. Deep cabinets became black holes where items would disappear forever.
The area beside my fridge collected dust bunnies and random objects. It became a dumping ground for things without a proper home. This wasted space frustrated me daily.

Reaching for ingredients meant searching multiple locations. High shelves required step stools while deep cabinets demanded archaeological excavation. My cooking efficiency suffered from this disorganization.
Regular kitchen cabinets simply weren’t designed for pantry storage. Their depth caused items to get lost in the back. Their height made accessing everyday ingredients a chore.
How This Solution Transformed My Storage
The breakthrough came when I measured that neglected gap. I realized this narrow space could become my perfect pantry solution. This idea sparked an organizational revolution in my home.
Suddenly, all my food items lived in one accessible location. No more searching through multiple cabinets during meal preparation. Everything became visible and within easy reach.
This project transformed not just my storage capacity but my entire cooking experience. The before-and-after difference was staggering. What was once wasted space became my most valuable kitchen asset.
Having a dedicated food storage area near preparation zones streamlined my workflow. Cooking became more enjoyable when ingredients were organized and accessible. This simple solution brought peace to my previously chaotic kitchen.
What You’ll Need: My Essential Tools and Materials List
Gathering the right supplies made my pantry project successful from the start. Having everything organized before beginning saved me countless trips to the hardware store. This preparation step proved crucial for maintaining momentum.
My experience taught me that quality materials make all the difference. Investing in good lumber and proper hardware ensures your storage solution lasts for years. Here’s exactly what worked for my build.
Lumber and Building Materials
I chose construction lumber for its strength and affordability. Two pieces of 2x6x8 boards formed my main framework. Their actual dimensions measured 1½” x 5½” after milling.
Cutting these into specific lengths created my box structure. I needed two 26-inch boards and two 66-inch pieces. This combination provided perfect proportions for my space.

For the back panel, 3/16″ plywood offered ideal support without adding bulk. Quarter round molding finished the edges beautifully. These materials created a professional-looking final product.
Selecting straight, knot-free boards proved essential. Warped lumber would have compromised the entire project. Taking time to choose quality wood paid off in stability.
Essential Tools for the Project
Basic measuring tools formed the foundation of my work. A reliable tape measure and combination square ensured accuracy. These simple instruments guided every cut and assembly step.
My Kreg R3 Jr. pocket hole jig became the star of the show. It created strong, hidden joints using specialized screws. This system eliminated visible fasteners for a clean appearance.
A circular saw made straight cuts quickly and accurately. Clamps held pieces firmly during assembly. These tools transformed raw materials into a functional storage unit.
Safety equipment protected me throughout the process. Safety glasses and hearing protection are non-negotiable. Working carefully prevented accidents and ensured quality results.
Optional Hardware for Customization
Customization options let me tailor the pantry to my needs. A unique handle added personal style and improved functionality. This small detail made the unit feel truly mine.
Specialized casters could enhance mobility if desired. Heavy-duty wheels support weight while allowing smooth movement. Choosing the right hardware elevates the entire solution.
Finish materials matched my existing kitchen decor. Paint or stain integrated the new unit seamlessly. These final touches made the pantry look built-in rather than added.
Organization accessories maximized the interior space. Adjustable shelves accommodated various items. These additions transformed basic storage into a customized system.
Having all supplies ready before starting proved invaluable. This preparation made the building process efficient and enjoyable. Proper planning truly separates successful projects from frustrating ones.
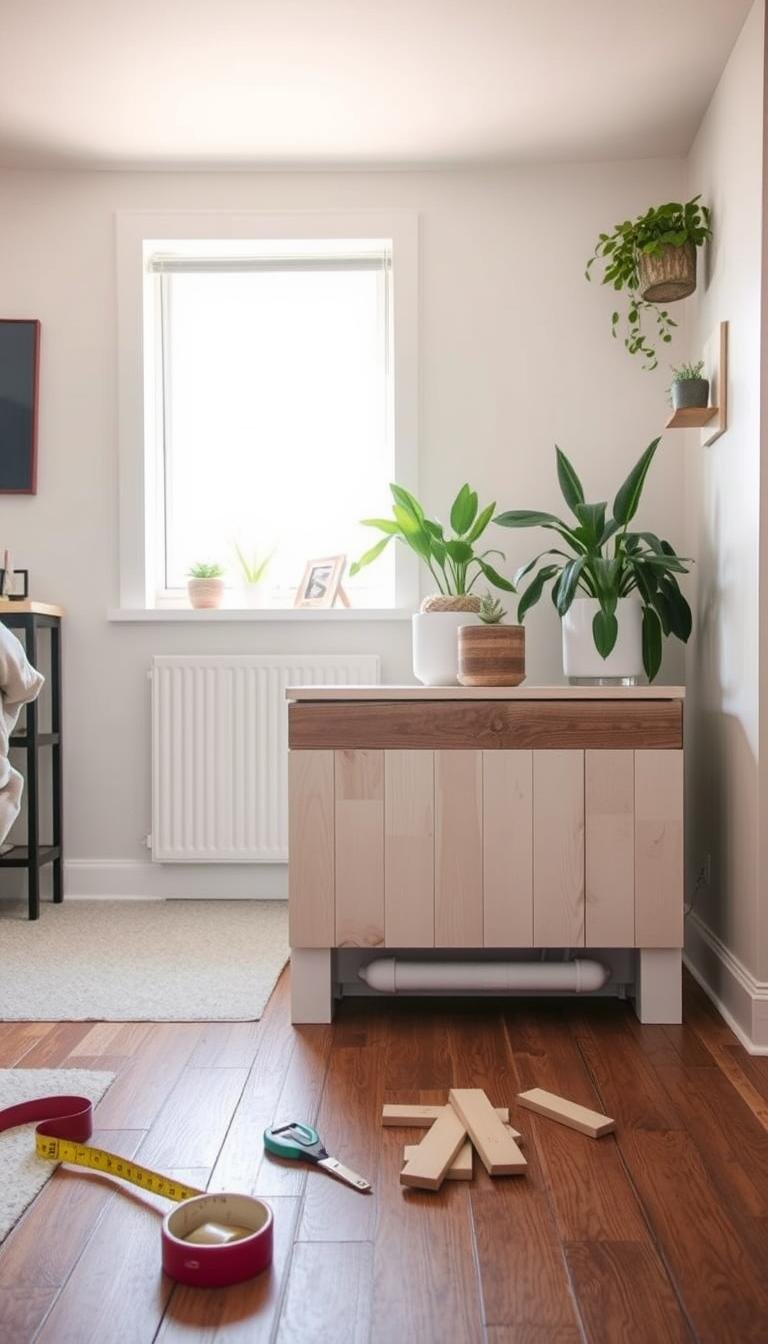
Measuring Your Space: The Critical First Step
Getting my tape measure out marked the real beginning of this transformation. This single step determined everything that followed. Precise numbers became my blueprint for success.
I learned that every kitchen gap tells a different story. My available area measured 6½” by 29″ – yours might vary. Understanding these dimensions prevented costly mistakes later.

Taking Accurate Fridge and Wall Measurements
I started by measuring the gap between my refrigerator and wall. The tape measure ran from the fridge side to the adjacent surface. I checked this distance at the top, middle, and bottom.
Walls often bow or tilt slightly over time. Multiple measurements revealed these subtle variations. Recording the smallest number ensured my pantry would fit everywhere.
Height considerations mattered greatly for visual harmony. I preferred my unit sitting slightly shorter than the fridge. This created a clean, intentional look rather than an awkward extension.
Accounting for Clearance and Functionality
Fridge door clearance became my next priority. The pantry needed to clear the door swing completely. I added two extra inches beyond the measured space.
Baseboards and moldings demanded special attention. These architectural features can reduce actual clearance. Measuring from the wall’s surface, not the trim, provided true dimensions.
I considered the walkway space beyond the pantry. The unit shouldn’t protrude into traffic areas. A shallower design sometimes works better than maximum depth.
My casters added about an inch of height. This affected my overall measurement calculations. Planning for hardware early prevented surprises during installation.
Finally, I measured my tallest pantry items. This ensured shelf spacing would accommodate everything. Proper planning transformed this narrow space into perfect storage.
Cutting and Assembling the Pantry Frame
Precision cutting techniques made all the difference in my pantry assembly. This phase transformed raw lumber into a functional storage solution. Getting each cut right ensured my box structure would fit perfectly.
I worked methodically through each step. Careful measurements guided every decision. The right approach here guaranteed professional results.
Precision Cutting Techniques I Used
My cutting system relied on simple jigs and guides. I measured the distance from my saw blade to the edge of the base. This became my cut distance measurement.
I calculated actual size plus cut distance for each piece. Setting up a square and clamping it down ensured straight cuts every time. This technique prevented wandering cuts and wasted materials.
Working on a flat surface prevented twisting during assembly. I checked each piece against my measurements before proceeding. Accuracy here saved me from fitting issues later.

Building a Sturdy Box Structure
Assembling the frame required careful planning. I organized my cut pieces before starting. The two 26-inch boards formed the shorter sides.
The longer 66-inch pieces created the front and back. I arranged everything to visualize the final box. This preparation made the assembly process smooth.
Checking for squareness at every stage proved crucial. I measured diagonally across the frame multiple times. Equal measurements confirmed perfect square alignment.
Using clamps effectively held pieces in position. This was especially helpful when working alone. The right clamping technique ensured everything stayed put during assembly.
My Pocket Screw Method for Clean Joinery
Pocket screws created strong, hidden joints for my pantry. I used a Kreg R3 Jr. to make the holes. This system eliminated visible screw heads for a clean look.
I placed three holes on the same face of the smaller pieces. This positioning meant the outside 66-inch board would remain screw-free. The finished appearance looked professional and seamless.
Getting the right screw size mattered greatly. I matched the Kreg setting to my lumber thickness. Using a clamp to hold everything steady prevented movement during drilling.
Taking my time with this step ensured quality results. Rushing could have meant misaligned holes or weak joints. Patience here paid off in a sturdy final product.
The pocket screw method transformed my basic box into a solid storage solution. This technique made assembly straightforward and reliable. The clean joints gave my pantry a built-in appearance.
Adding the Back Panel for Stability
Securing the framework with a solid backing transformed my basic box into a professional-grade storage unit. This crucial step prevented racking and ensured long-term durability for my kitchen pantry. The right backing material made all the difference in creating a stable structure.
Choosing the Right Backing Material
I selected 3/16″ plywood for my pantry backing after careful consideration. This thickness provided perfect balance between strength and weight. Thinner materials would lack stability while thicker options added unnecessary bulk.
My research confirmed this choice through practical testing. Quality plywood resists warping better than particle board. It handles moisture changes common in kitchen environments much more effectively.
Cutting large panels required special attention to detail. I used painter’s tape along cut lines to prevent tear-out on the back side. This simple trick kept the edges clean and professional-looking.

My Flush-Mount Installation Technique
Creating a seamless appearance demanded innovative thinking. I inlaid scrap wood blocks inside the frame to serve as mounting points. This clever solution allowed the plywood to sit perfectly flush with the back edge.
The installation process followed a logical sequence:
- Position scrap wood blocks at strategic points inside the frame
- Flip the entire unit to access the interior easily
- Secure the plywood panel using finishing nails
- Check alignment from multiple angles before final fastening
Finishing nails proved superior to screws for this application. They minimized splitting risk in the delicate plywood edges. The clean result looked like factory-made furniture rather than a DIY project.
Finishing with Quarter Round Molding
Quarter round molding provided the perfect finishing touch for my storage solution. This 1/4″ trim covered raw edges and added visual appeal. It transformed the basic box into a refined piece for my home.
Cutting molding pieces required precision measuring techniques. I used a miter box for perfect 45-degree angles at corners. Dry fitting ensured everything aligned properly before final installation.
The installation process followed these key steps:
- Measure each edge carefully, accounting for corner overlaps
- Cut pieces with slight extra length for fitting adjustments
- Test fit all pieces before applying any fasteners
- Secure with finishing nails, spacing them evenly along the length
Filling nail holes created a seamless appearance. I used wood filler that matched my planned finish color. Sanding everything smooth prepared the surface for painting or staining.
This comprehensive approach to cabinet backing elevated my entire project. The finished unit felt solid and moved smoothly on its casters. Every step contributed to creating quality storage that transformed my kitchen organization.
For more inspiration on creative home solutions, explore our home transformation mission that guides all our projects.
Designing and Installing Custom Shelves
Creating the perfect shelf layout transformed my narrow gap into a highly functional storage system. This phase required careful planning and precise execution to maximize every inch of available space. The right shelf design made my pantry organization truly exceptional.
Planning Shelf Heights for Your Items
I started by measuring my most commonly used pantry items. Cereal boxes needed about 13 inches of clearance. Smaller packages required 9 inches while canned goods fit perfectly in 7-inch spaces.
My mathematical formula ensured everything would fit perfectly. I calculated total height needed by adding all shelf clearances plus shelf thickness. Six shelves at 3/4″ thickness added 4.5 inches to my total.
This gave me 56.5 inches total with 6.5 inches to spare in my 63-inch interior. The extra space at the top and bottom created perfect visual balance. Custom spacing accommodated my specific storage needs beautifully.

Cutting and Grooving Shelf Boards
Cutting multiple shelves to identical dimensions required a simple jig system. I used a stop block on my miter saw for consistent lengths. This technique ensured all six shelves matched perfectly.
Creating grooves for shelf supports demanded precision work. I used a router with a straight bit set to 1/4 inch depth. A homemade guide kept my grooves straight and evenly spaced.
Testing each shelf in the grooves before final assembly proved crucial. This step revealed any fitting issues that needed adjustment. Proper planning here prevented frustration during installation.
My Space Optimization Formula
Varying shelf heights created incredibly flexible storage options. Tall spaces accommodated cereal boxes and large packages. Medium shelves held baking supplies and snack items perfectly.
Smaller sections organized canned goods and spices efficiently. This thoughtful layout placed frequently used items at eye level. Less common ingredients found homes on higher or lower shelves.
I placed the most accessed things in the most accessible locations. Everyday cooking staples occupied the middle shelves. Seasonal or occasional items went toward the top and bottom.
Custom spacing proved far superior to standardized measurements. My system accommodated exactly what I needed to store. This approach transformed my kitchen organization completely.
Sanding all edges created a professional finish and safe surfaces. Smooth edges prevented splinters and looked much more refined. This final touch made my DIY project look store-bought.
What’s the Easiest Way to Add a Pull-Out Pantry Next to the Fridge?
Discovering the perfect approach transformed my kitchen organization journey. This streamlined method made the entire process feel manageable and rewarding. I want to share the system that worked beautifully for my home.
Breaking the project into logical phases prevented overwhelm. Each step built upon the previous one naturally. This approach kept me motivated throughout the entire build.

The Step-by-Step Method That Worked for Me
My system focuses on functionality first, with aesthetics coming later. I started with careful planning and precise measurements. This foundation ensured everything else fell into place perfectly.
I prioritized the most important steps to build confidence early. The frame construction came first, followed by shelving. This logical progression made the project feel achievable.
Working methodically and checking progress at each stage proved crucial. I celebrated small victories along the way. This kept momentum high and frustration low.
My approach allows for adjustments and modifications during construction. Rigid planning often leads to disappointment. Flexibility became my secret weapon for success.
Why This Approach Saved Time and Frustration
Time-saving techniques eliminated unnecessary steps completely. I avoided common mistakes that complicate simple projects. This efficiency made the experience enjoyable rather than stressful.
The system adapts beautifully to different spaces and needs. My kitchen layout required specific modifications. The method accommodated these changes effortlessly.
Completing a functional project that improves daily life brings immense satisfaction. Seeing my organized pantry every morning feels incredibly rewarding. The transformation exceeded my expectations completely.
This practical approach uses low-cost materials and simple joinery effectively. As demonstrated in this space-efficient pantry project, careful planning and straightforward construction yield excellent results. The unit holds numerous kitchen items while freeing up main storage areas.
Installing Shelf Supports and Casters
Securing my shelves and wheels properly made my pantry both functional and mobile. This critical installation phase turned my stationary box into a smooth-rolling storage unit. Getting these elements right ensured long-term stability and easy access.
I learned valuable lessons through trial and error during this process. My initial approach seemed logical but revealed flaws under actual use. These experiences helped me develop better techniques for lasting results.
My Doweling Technique for Shelf Stability
Using a dowel jig created strong, invisible supports for my shelves. I started from the bottom and worked upward methodically. This approach maintained consistent spacing throughout the interior.
I measured each shelf position carefully before drilling. My technique involved marking one side completely first. Then I used a level across the shelf to transfer marks to the opposite side.

Mistakes happened during my first attempts with the jig. Fortunately, dowel errors are easily fixable with basic tools. Some glue and careful sanding concealed any imperfections perfectly.
This method created incredibly sturdy shelf placement. The hidden supports maintained clean lines inside my storage unit. Everything felt solid and professional when completed.
Choosing and Mounting the Right Casters
Selecting appropriate wheels proved crucial for smooth operation. I considered weight capacity and floor protection carefully. Heavy-duty casters with rubber wheels offered the best solution.
My initial mounting position seemed correct in theory. However, loading the pantry revealed a serious stability issue. The unit became dangerously top-heavy when filled with items.
I learned that caster placement affects balance significantly. Wider positioning creates better stability under heavy loads. This adjustment transformed the functionality completely.
Testing movement with weight before final installation proved essential. I loaded the pantry with books to simulate actual use. This revealed the top-heavy problem before it caused accidents.
Avoiding My Top-Heavy Mistake
My first caster installation taught me about weight distribution. The wheels were too close together for the height. This created a tipping hazard when fully loaded.
I corrected this by widening the caster placement significantly. The new position created a much more stable base. The pantry now rolls smoothly without any wobbling or tipping.
Proper caster selection also prevented floor damage. Rubber wheels protect hardwood surfaces beautifully. They also provide quiet operation that doesn’t disturb the household.
Mounting casters securely ensured long-term durability. I used appropriate screws for the lumber thickness. Reinforced corners prevented any loosening over time.
This experience taught me valuable lessons about functional design. Sometimes the most logical solution needs practical testing. Real-world use often reveals issues that planning misses.
For more insights on creating effective storage solutions, explore our guide on crafting perfect organizational systems that transform your living space.
Adding Custom Hardware and Finishing Touches
The final phase brought my pantry from functional to fabulous. Custom details transformed this simple storage unit into a personalized kitchen feature. These finishing elements made the project feel truly integrated into my home.
Creating a Custom Handle (3D Printed Option)
Designing my own handle became the most rewarding part. Using SketchUp, I created a unique pull that matched my kitchen’s style. The process felt surprisingly accessible even for beginners.
I followed this straightforward method:
- Designed the handle and dowel rod holders in SketchUp
- Exported the model as an .stl file using J. Foltz extension
- Ran the file through NetFabb Studio to fix any issues
- Sent the prepared file to my 3D printer

Color selection made everything pop beautifully. My fiancée suggested alternating colors between components. This creative touch added personality and visual interest.
For those without 3D printing access, many alternatives exist. Local maker spaces often offer printing services. Pre-made handles from hardware stores work equally well.
Installing Dowel Rod Holders for Organization
Vertical organization solved my spice jar chaos. Dowel rod holders created perfect dividers for small items. This system kept everything visible and accessible.
Installation required careful spacing measurements. I marked positions before securing with small screws. The holders fit snugly between shelves without interfering with movement.
Painting the dowels contrasting colors enhanced functionality. Different colors helped categorize various product types. This visual system made finding ingredients incredibly fast.
Painting and Personalizing Your Pantry
Choosing the right finish transformed the entire appearance. I matched my existing kitchen cabinets for seamless integration. This made the unit look built-in rather than added.
Preparation ensured a professional-looking result. Light sanding created the perfect surface for paint adhesion. Using primer helped the finish last longer and resist stains.
Durability considerations guided my product selection. Semi-gloss paint offered easy cleaning and moisture resistance. This finish handles kitchen splatters and frequent cleaning beautifully.
Color coordination created visual harmony throughout the space. I sampled several shades before committing. The right choice made the pantry feel like it always belonged there.
These personal touches elevated my solution from practical to exceptional. The finished cabinet now stands as one of my favorite kitchen features. For more inspiration on personalized home solutions, explore our creative approach to home transformation.
Organizing Your New Pull-Out Pantry
Seeing my completed pantry filled me with excitement. The real magic happened when I transformed this empty space into an efficient storage system. Proper organization turned my new cabinet into a kitchen game-changer.

Categorizing Items for Maximum Efficiency
I developed a smart categorization system for my pantry items. Everything found its perfect place based on how often I used it. Daily essentials occupied the middle shelves at eye level.
Breakfast foods lived together in one zone. Baking supplies occupied another section. This logical grouping made meal preparation incredibly smooth.
I created specific areas for different meal types. Dinner ingredients had their own dedicated space. Snacks and lunch items occupied separate sections.
This system eliminated searching through multiple locations. Everything became intuitive and easy to find. My cooking efficiency improved dramatically.
Using Clear Bins and Containers Effectively
Clear containers revolutionized my pantry organization. They created a clean, uniform appearance throughout the cabinet. More importantly, they let me see my items at a glance.
I discovered several advantages to this approach:
- Instant visibility of inventory levels prevents running out of staples
- Uniform containers maximize every inch of shelf space efficiently
- Removing bulky packaging creates significantly more storage capacity
- Stackable designs utilize vertical space beautifully
Baskets with handles proved perfect for higher shelves. They corralled smaller items like granola bars and fruit cups. Everything stayed organized and accessible.
My Labeling System for Easy Access
A consistent labeling system completed my organization solution. I used a simple label maker for clear, professional-looking tags. Each container received its appropriate identification.
My labeling approach followed these principles:
- Large, easy-to-read fonts for quick identification
- Consistent placement on every container
- Inclusion of expiration dates when relevant
- Color coding for different categories
This system made finding ingredients incredibly fast. Even family members could locate things effortlessly. The labels maintained organization long-term.
Regular reviews kept everything current and functional. I adjusted placements as my needs evolved. This maintained the system’s efficiency over time.
My organized pantry now saves me time every day. It reduces food waste through better visibility. This smart storage solution transformed my kitchen experience completely.
Maintenance and Ongoing Organization Tips
The real test of any organizational system comes after the initial setup. Keeping my pull-out pantry functioning perfectly required developing simple routines. These habits ensured my kitchen storage remained efficient and adaptable.
I learned that periodic reviews prevent clutter from creeping back in. Small adjustments maintained the system’s effectiveness over time. This proactive approach saved me from major reorganizations later.

Keeping Your Pantry Functional Long-Term
Regular cleaning became part of my monthly kitchen routine. I wipe down shelves during regular cleaning sessions. This prevents sticky residues from building up over time.
Checking expiration dates monthly helps keep my pantry current. I remove anything past its prime immediately. This habit reduces waste and maintains food safety.
The pull-out mechanism needs occasional attention too. I lubricate the wheels every six months for smooth operation. This simple solution prevents sticking and ensures easy access.
Adjusting Shelves as Your Needs Change
My storage needs evolved with seasonal cooking and dietary changes. The adjustable shelves allowed perfect customization. I could reconfigure spaces for different types of items.
When my family’s eating habits shifted, the cabinet adapted beautifully. I created taller sections for new bulk purchases. Smaller spaces accommodated specialty ingredients perfectly.
Complete reorganizations occasionally refresh the entire system. I take everything out and reassess the layout. This process often reveals new efficiencies I hadn’t considered.
Seasonal Rotation Strategies
Seasonal changes demand different storage approaches. Summer grilling supplies replace winter baking ingredients. I rotate items based on current cooking activities.
I follow this smart advice from organization experts:
“If you are setting out to create a pantry somewhere in your kitchen or home (or even reorganize a ‘real’ pantry), I strongly recommend you do so immediately following a full grocery trip. If you’re going to make the effort of adjusting shelves, corralling like items, and finding the right spot for your ‘usual’ pantry stock, you need to have those items on hand.”
Maintaining an inventory list helps track what I have available. I note when I open new packages of staples. This system prevents overbuying and reduces food waste.
Bulk purchases require special consideration in limited space. I transfer large quantities to smaller containers for daily use. The remainder stays in original packaging elsewhere until needed.
These maintenance strategies transformed my kitchen experience completely. The space beside my fridge remains my most valuable storage area. Regular attention ensures it continues serving my family’s needs perfectly.
Conclusion
Looking back at my kitchen transformation fills me with immense satisfaction. This custom storage solution turned wasted space into functional organization. My daily routine improved dramatically with everything within easy reach.
The project demonstrated how even narrow gaps can become valuable assets. Custom solutions beat one-size-fits-all approaches every time. Thoughtful planning created lasting results that serve my family’s needs perfectly.
I encourage you to look at your own home with fresh eyes. That awkward space might hold your next great organization idea. The effort pays off in daily convenience and kitchen efficiency.
This experience inspired me to rethink other underutilized areas. Your home likely has similar opportunities waiting for creative solutions. Embrace the challenge and transform your space too!