How can I add a sliding barn door to a narrow hallway?
I framed this project around one big question because I wanted a clear path to reclaim space without a major remodel. My goal was simple: save swing clearance, keep clean lines, and match my home’s modern look.
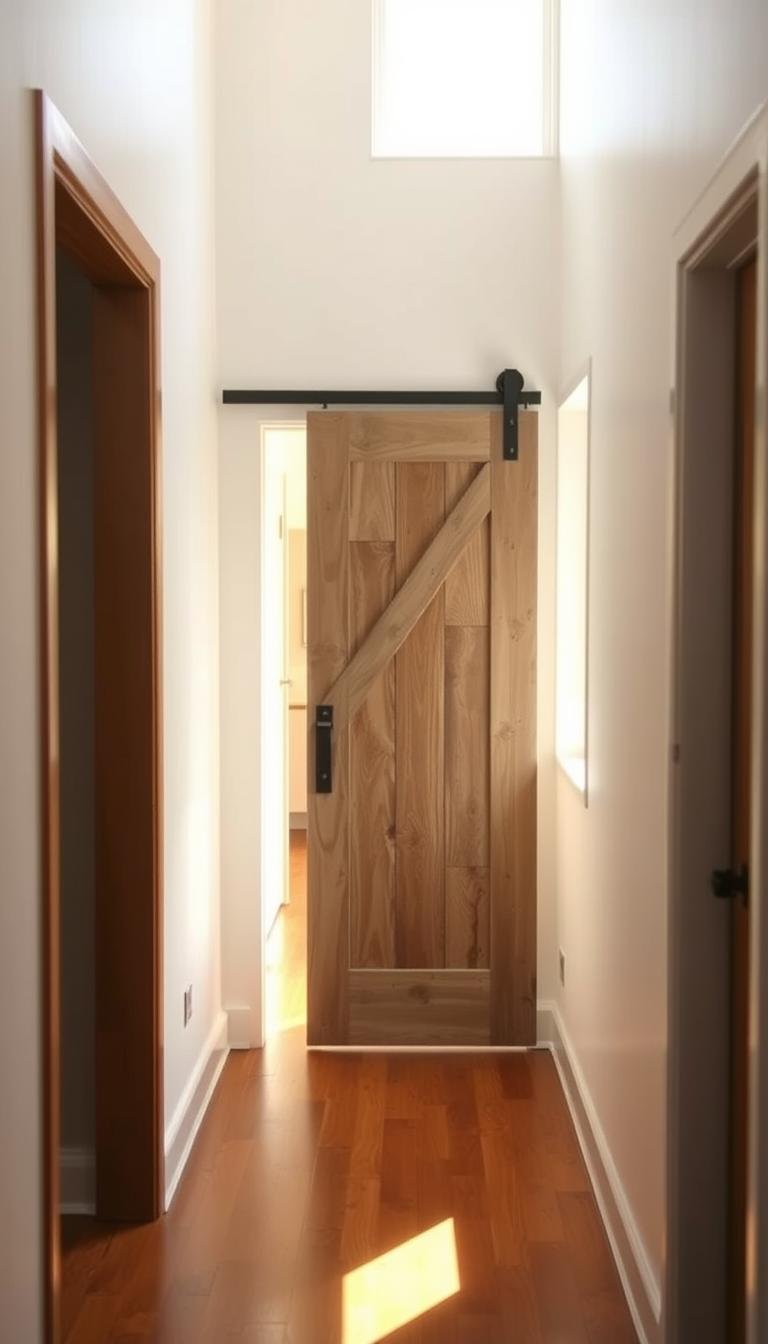
I chose quality hardware that moved smoothly and quietly in real installs. Stainless steel rollers and red oak PureBond plywood gave a classic, neat finish. Removing the jamb and creating a cased opening made the passage feel wider.
Each component mattered: track, rollers, door, recessed pull, and a brushed nickel 12.5″ handle. That hardware cleared trim, improved grip, and supported long-term durability. I measured studs and verified wall space equaled the door width so the panel could slide fully out of the way.
This solution worked well in tight areas, turning an awkward transition into a practical design feature. I’ll walk through feasibility, needed tools, and finishing touches so people can follow the same way I did it.
Key Takeaways
- Saves space: sliding units free up swing area and open passages.
- Choose sturdy hardware: smooth rollers and solid track prevent issues.
- Material matters: red oak plywood offers a durable, classic look.
- Prep the wall: measure, find studs, and ensure enough clearance.
- Design for the home: streamlined hardware creates a modern aesthetic.
Will a sliding barn door actually work in my narrow hallway?
My intent and constraints were simple: reclaim space, keep noise low, and preserve clean lines in an interior passage. I needed a solution that saved swing clearance and looked neat when parked.
My first step was a simple fit test at the opening and along the adjacent wall. A barn door needs uninterrupted wall space on one side at least equal to the door’s width so the panel can slide fully clear.

Quick fit test for tight hallways
Measure the opening and wall run. Make the panel several inches wider than the doorway to cut gaps.
Check projection and pass-through comfort. In my 38‑inch hallway example a 2‑inch projection raised questions about clearance around switches and how people carry things past the door.
- Confirm track length equals twice the door width so the panel clears the opening.
- Walk the wall to note switches, outlets, vents, and trim that could interfere.
- Plan a header on a 2×6 fastened into studs — wall anchors alone are not enough.
- For a bathroom, choose a recessed pull and privacy latch that won’t conflict with the jamb.
| Requirement | Minimum | Why it matters |
|---|---|---|
| Wall run | Equal to door width | Allows full parking of the panel |
| Door width vs opening | Door several inches wider | Reduces light and privacy gaps |
| Track length | 2× door width | Keeps door from stopping short |
| Mounting | 2×6 header into studs | Structural support for long-term use |
Final thought: If your wall run, projection, and mounting options check out, a barn door is often the best way to free up space without sacrificing interior style.
How can I add a sliding barn door to a narrow hallway? The planning and measuring I do first
I began by measuring the opening precisely and marking where the track and stops would land. That quick layout told me what door size and hardware would work in my tight space.

Measuring the opening and selecting the right door
I measured height and width, then picked a door wider than the doorway. For example, a 4‑foot door over a 3‑foot opening gives about 6 inches overlap each side for better privacy and light control.
Hallway width and panel projection
My hallway was about 38 inches. A panel that projects 2 inches off the wall can make walking tight, so I balanced clearance and standoff from the casing.
Track length, header and mounting
Size the track at twice the door width so the panel fully parks clear. Use a full‑length 2×6 header fastened into studs; avoid wall anchors for load points.
Mapping the wall run
- Mark switches, outlets, vents, and artwork so the door won’t block them when open.
- Check where rollers, standoffs, and stops land and pre‑drill for accuracy.
- Plan a recessed pull inside and a surface handle outside, and confirm trim clearance.
Design and hardware choices that suit a small space and my home’s style
Picking the right mix of rail profile, finish, and pulls made the installation feel like part of the house. I focused on a slim profile and quiet operation so the narrow run stayed calm and usable.

Modern stainless steel versus rustic finishes
I weighed stainless steel kits against flat black, choosing the finish that matched nearby fixtures and made the corridor read larger.
Options included aluminum flat rail, round rail, and stainless steel. I matched rail profile to the wooden door and nearby plumbing and lighting finishes.
Pulls, recessed pulls, and privacy latches
I used a recessed finger pull inside to avoid clash with the casing. For privacy rooms I chose compact strike-plate latches or a simple hook latch that clears trim.
“High-quality hardware keeps the door rolling smoothly and quietly in tight spaces.”
- Priority: quiet rollers and serviceable parts for long life.
- Match handle finish to the rail for a built-in look.
- Verify standoffs so the sliding door clears casing but stays close to the wall.
| Feature | Choice I made | Why it mattered |
|---|---|---|
| Rail profile | Stainless steel round rail | Streamlined look, quiet roll |
| Pull | Recessed finger pull + outside handle | Cleans sightline, avoids jamb conflicts |
| Latch | Strike-plate latch | Compact, bathroom-friendly |
| Door material | Red oak PureBond plywood | Warm wooden door look, stable in traffic |
For more on space-saving options, see space-saving options that fit tight hallways and interior rooms.
My step-by-step approach to a seamless installation in a tight hallway
I started by removing the old frame and working toward a clean cased opening that felt intentional. I removed hinges and carefully deconstructed the door jamb, then trimmed and rebuilt the casing so the result looked planned rather than patched.

Prepping the doorway
Demolish with care: jambs are often multi-piece and need patient chiseling. I dry-fitted trim pieces as I went so gaps stayed tight.
Mounting the header and track
I cut and leveled a 2×6 header, screwing it into multiple studs. I sized the track at twice the door width so the panel parks fully clear the opening.
I pre-drilled, used spacers, and attached stainless steel rollers to the wooden door at measured offsets. Dry-fitting the assembly kept surprises low.
Finishing touches
- I set a floor guide aligned to the bottom groove to stop sway.
- I countersunk the recessed pull and fitted a brushed nickel 12.5″ handle on the outside.
- I placed end stops to protect trim and adjusted roller spacing until the sliding door tracked whisper-quiet.
“Quality hardware and careful layout made the result feel built-in, not tacked on.”
| Step | Action | Reason |
|---|---|---|
| Door jamb prep | Remove hinges, chisel multi-piece jamb | Creates a neat cased opening for trim |
| Header & track | Install 2×6 header into studs; track = 2× door width | Supports hardware and full panel parking |
| Hang & align | Mount rollers, set floor guide, adjust stops | Prevents drift and protects trim |
Conclusion
,Choosing the right panel width and solid mount changed this narrow run into an asset. I proved that a barn door works when the panel is wider than the opening and the track equals twice the door width.
Anchoring the header into studs made the door hardware feel rock solid. Quiet rollers and good stops kept daily operation smooth and safe.
I matched wood and steel finishes so the design fit my home. Thoughtful pulls and a compact privacy latch made the setup ready for a bathroom or bedroom.
This solution freed closet and kitchen circulation and hid storage or media in other places. Measure the doorway and wall one last time, choose quality hardware, and enjoy the improved flow.