What Are the Essential Decor Elements Around a Backyard Fire Pit?
I treat my fire feature as the beating heart of my yard, a focal spot where friends gather and the mood shifts from casual day to cozy night.
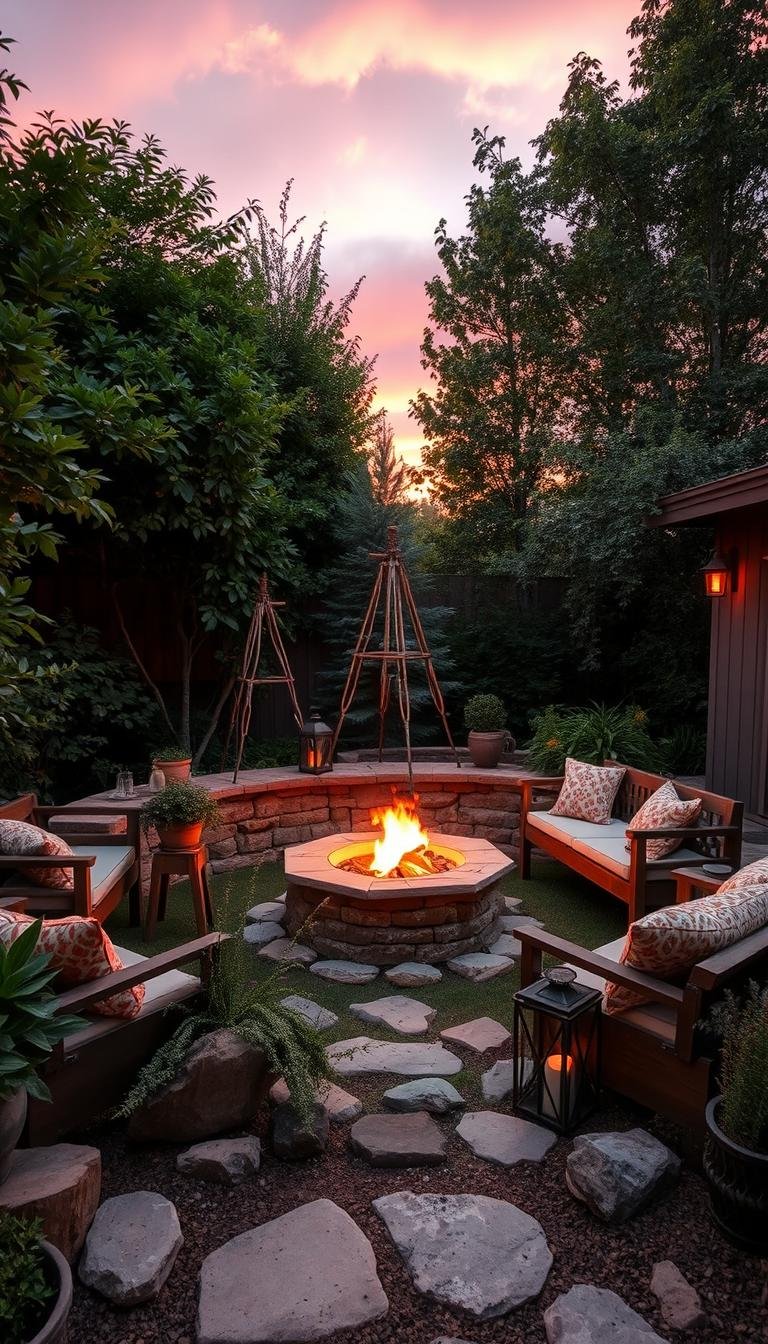
I mix practical choices, like stone rings with metal inserts and pea gravel underfoot, with style moves such as lanterns and a monochrome palette to lift the look.
Safety guides every decision: nonflammable bases, proper clearances, and wide-armed chairs or side tables that keep drinks close without crowding the area.
I love convertible covers that turn the pit into a coffee table by day, then flip the vibe to s’mores-ready when dusk arrives.
Layered lighting — Edison bulbs above a gravel patio plus large hurricanes — creates warm ambiance that flatters people and space.
Key Takeaways
- Blend durable materials like stone, concrete, and metal for a cohesive style.
- Prioritize safety with nonflammable surfaces and proper clearances.
- Choose seating and side tables that support relaxed gatherings.
- Layer lighting with string bulbs and hurricanes for night appeal.
- Use convertible covers to make the area useful day and night.
My Must‑Have Checklist: What Are the Essential Decor Elements Around a Backyard Fire Pit?
I start with the flame at the center, then arrange the rest so the space feels intentional and safe.
Define the ground with nonflammable materials: gravel, pavers, or stone so the pit reads as a finished space and adds drainage.
Choose seating that faces the flames without blocking walkways. Adirondacks, a compact sectional, or built-in benches work well. Add side tables so guests have spots for drinks and plates.
Plan layered lighting—overhead strings for warmth, lanterns for atmosphere, and low path lights for safe navigation. Lighting makes the space usable and extends evenings.

- Keep greenery in containers or plant natives at a safe distance from the flame.
- Pick a materials palette—stone, brick, or concrete—and repeat it so the design has a cohesive look and feel.
- Check wind patterns, honor clearances, and pick the right pit type to make safety part of the design, not an afterthought.
Quick self‑check: comfort, ambiance, and safety balanced in a compact footprint that still feels generous to guests.
Safe, Smart Placement That Sets the Stage
I always pick the spot for my fire feature with safety and sightlines in mind. Placement is a design choice and a safety move. I set the base on non‑flammable materials so embers land on gravel, pavers, stone, or concrete, not turf.

Rules I follow:
- I keep at least 25 feet from structures, size flames to about 3 feet across and 2 feet high, and always have a hose or extinguisher nearby.
- I map prevailing wind so smoke stays out of seating and leave a clear downwind corridor for comfort and air flow.
- I check permits and local burn bans before lighting and route any gas lines with my landscaping plan in mind.
- I position the pit where views are best, approaches stay slip‑resistant, and overhangs or low branches are avoided.
These placement steps make the outdoor space safe and low‑maintenance while keeping the flames the welcoming focal point. For build guidance, see this build a custom fire pit resource.
Seating That Invites Conversation and Relaxation
I design seat layouts so friends can talk, reach drinks, and enjoy warm light together.
Mix classic and modular pieces—Adirondack chairs for relaxed posture, a rounded sofa to pull people into close conversation, or a sectional that changes with the night.

Built‑ins and flexible benches
Built‑in sitting walls and L‑shaped banquettes pack in more capacity without cluttering the footprint.
Sitting walls double as boundaries, giving privacy and an outdoor room feel.
Tables, wide arms, and perches
I keep side tables and wide‑armed chairs close so guests never balance mugs and plates on knees.
Stools and small perches let me tighten the circle on cool nights or open it for larger gatherings.
Materials, cushions, and layout tips
I pick weatherproof fabrics and mix teak, metal, or all‑weather wicker for durability and style.
Angle seats toward the flame while leaving clear pathways behind them to reduce trip hazards.
| Seating Type | Best Use | Capacity |
|---|---|---|
| Adirondack chairs | Classic comfort, easy to move | 1–4 per group |
| Rounded sofa / sectional | Encourages close conversation | 3–6 |
| Built‑in benches / walls | Max capacity, defines area | 4–8 (depending on run) |
Layered Lighting: String Lights, Lanterns, and Pathway Glow
I layer light to guide movement, set mood, and keep the flame as the visual anchor. Good lighting should help guests find seats, flatter faces, and keep the area safe without stealing focus from the fire.

Overhead glow without risk
I hang string lights at least eight feet above my pit so bulbs form a warm canopy without drifting into heat. Edison-style bulbs over gravel or pavers add a welcoming glow that pairs well with natural flames.
Mid-level lanterns and hurricanes
I cluster lanterns and hurricanes on stable, non-flammable surfaces to create golden, flickering ambiance. That mid-level light flatters skin tones and adds depth to the space while sitting safely away from sparks.
Low path markers for safe approach
I lay low-glare path lights along entries and steps so guests can see edges and walkways. I pick warm color temperatures (about 2700–3000K) so the lights harmonize with firelight rather than competing.
- Use outdoor-rated cords and GFCI outlets; keep connections off wet ground.
- Install dimmers or smart plugs to shift from task brightness to soft mood light.
- Wrap trees only where clearance from flames is certain, and shield lights from reflective glare on nearby windows.
- Keep a portable lantern handy for late-night tasks or a safe walk back inside.
Materials Palette That Looks Good and Performs
I pick materials that last, so the fire feature looks intentional and holds up through seasons.
Start with a core palette of stone, brick, or concrete. These materials resist heat and weather while giving the space a unified look.
I often add a metal insert inside masonry for easier cleanup and better ash containment. Lava rock or smooth river stones make an attractive top media that hides soot and reflects warm light.
For finish choices, I balance monochrome schemes against mixed textures. Monochrome concrete gives calm, modern lines. Mixed stone and brick create a layered, natural vibe that reads more rustic.

I match stone to existing exterior or patio pavers so the area feels integrated. In cooler climates I pick freeze‑thaw resistant masonry and sealed concrete caps. For a crisp modern look, white‑painted brick with a cement cap reads clean but still warm when the flame is lit.
- Detail capstones so guests can perch without thin materials getting hot.
- Test samples in daylight and night to see how soot and light behave.
- Keep the palette tight so the flame stays the hero while materials do the heavy lifting.
Groundcovers, Borders, and the Fire Pit Area Underfoot
I choose surfaces that control water, define edges, and make the circle around the flame feel finished.

Pea gravel, pavers, and flagstone each bring different benefits. I use pea gravel for quick drainage and easy leveling. Pavers or honed flagstone give a walkable, formal surface when I want people barefoot-friendly paths.
Edges and low walls that do double duty
I define the perimeter with stacked stone or a low seat wall so the space reads as an intentional outdoor room within my landscaping. These walls add overflow seating when gatherings grow.
- I compact a base and add edge restraints so pavers stay put through seasons.
- I slope the surface slightly to drain away from the pit and avoid puddles.
- I place container gardens at the edge for color, keeping plants a safe distance from fire.
- I lay a weed barrier under gravel and refresh the top layer yearly for tidy upkeep.
“A well-built underfoot makes the whole area feel welcome and low-maintenance.”
Quick tip: sweep polymeric sand into paver joints to lock stones in place and discourage sprouting between seams.
Multifunctional Features That Elevate the Experience
I want my fire feature to do more than glow — it should add surface, cooking options, and comfort so time outside feels effortless.

Cover conversions for daytime use
I use a sturdy cover that converts the fire pit into a coffee or cocktail table by day. This gives the space extra surface for snacks, board games, or a tray of drinks without expanding the footprint.
Grill add-ons and chilled serving
I fit a grill grate or swing-away attachment to turn the pit into a casual cook station. That keeps dining and conversation in one spot and makes it easy to serve guests.
For drinks, I try an integrated ice ring or a shaded cooler cabinet when the climate allows.
Trellises, shade, and quick storage
An open trellis or pergola gives light shade and visual definition while keeping safe clearances above the flames. I also build a small storage bench for cushions and skewers so setup is fast.
Tip: coordinate multifunction pieces in the same materials palette so the design feels cohesive whether the fire is on or off.
Pathways, Zones, and Flow Around the Focal Point
I design gentle routes lined with planters and arbors so the journey to the flame feels like part of the evening.

I lead guests with stepping stones and low‑glare markers that cue the main path. Arbors wrapped in string lights give a warm sense of arrival and frame views toward the focal point.
I place the dining table within sight of the fire pit while tucking the grill just off the main flow. That keeps smoke and heat out of seating and lets cooks move freely.
Clear transitions and circulation
I shift paver size or pattern to signal zone changes without building walls. Wide lanes let people pass between dining, grilling, and conversation areas without squeezing behind chairs.
- I cluster planters where paths bend to steer movement and soften edges.
- I align lighting with traffic—low along edges, higher at intersections—so the space reads intuitively after dark.
- I orient the primary path out of prevailing wind so arriving guests avoid smoke.
Tip: keep sightlines open to the house and tuck a small storage niche near the grill for tools so the gathering feels effortless.
Style Ideas: Rustic Campfire Vibes to Sleek Modern Lines
I balance cozy, wooded touches with clean modern lines so the gathering spot reads both warm and deliberate.

Rustic route: I channel campfire charm with log perches, pebble groundcover, and lava stone that celebrates the flames. This look feels relaxed and invites friends and family to linger.
Modern route: I pick crisp angles, white‑painted brick, and cement caps for a minimalist, architectural look. Smooth river stones inside an angular basin add organic texture without softening the geometry.
I add privacy with layered plants and a low sitting wall to create a tuckedaway spot. For breezy yards I integrate a wind‑sheltering wall or partial surround so everyone stays comfortable around fire pit.
Finishing moves: a minimal pergola echoes materials overhead, and curated blankets, lanterns, and trays keep the elements cohesive. I favor durable finishes so beauty holds up with use, and I repeat tones from pavers to cushions for a unified feel.
Conclusion
, I close with clarity: I end with a simple rule: start with safety, repeat your materials, and design for lingering conversations.
I keep placement smart—at least 25 feet from structures, supervision in place, and flames sized near 3 by 2 feet—for peace of mind in my outdoor space. I always set the base on non‑flammable ground and pick stone, brick, or concrete with metal inserts for durability.
I plan seating and furniture so guests can chat and reach drinks, add layered lighting (strings hung eight feet high plus lanterns), and tuck plants back for beauty without risk. Small multifunction upgrades and clear paths make the fire pit area usable and welcoming night after night.