How Do I Organize a Walk-In Closet for Maximum Efficiency and Style?
I framed this guide around how I actually organized my closet so you can copy exact steps and save both space and time. I sketched my wardrobe, measured the footprint, and used blue painter’s tape to test rod heights, shelf spots, and drawer depths before building.
That low-risk test showed how storage would function in real life. I set up drawers with dividers and used file-folding to keep items visible. High shelves sit 12–18″ from the ceiling for off-season pieces while daily clothes stay at arm height.
I added a focal point opposite the entrance, matched slim hangers for a boutique look, and planned outlets for a lamp and chargers. Labels on bins keep categories obvious, and a simple hamper and valet hook handle real life.
Key Takeaways
- Map the layout with tape to test real use before building.
- Prioritize drawers with dividers and file folding for fast upkeep.
- Use high shelves for seasonal storage and keep daily items reachable.
- Match hangers and add a focal point to lift the room’s style.
- Label bins and include a hamper so the system stays tidy over time.
My Game Plan: Intent, Workflow, and the Closet I Actually Use
I set up distinct zones so my morning routine could flow from hats down to shoes without wasted steps. I thought in zones — workwear, loungewear, and workout — and placed the things I reach for most closest to the door. This made every outfit move feel natural and fast.

How I match my daily routine to zones from head to toe
I mapped my morning ritual first, then built zones to mirror it. Hats sit high, shirts and jackets on the upper hanging rod, and pants on the lower rod so hanging mirrors how I dress.
- I kept daily clothes in the most accessible space and parked special‑occasion pieces farther back.
- A small workout zone holds socks, sports bras, and leggings for quick mornings.
- Accessories live by the mirror for easy try‑ons and staged grab‑and‑go spots hold keys and a watch for the day.
- A valet hook catches yesterday’s jeans or dry cleaning so random piles don’t spread across the room.
Using one consistent system—grouping items by type, then color—kept the visual search quick. The result was simple organization that respected breathing space between zones and kept each item in its home.
Prep Like a Pro: Inventory, Measurements, and Must‑Haves
I started by counting each garment and measuring how many inches of bar and shelf each category needed. That small step saved time and kept the build honest about actual size and space.

What I measure first
Measure once, trust the tape.
- I listed every single item and measured bar width for shirts, jackets, and dresses (long dresses needed about 52″ of hanging height).
- Shoe lengths guided shelf depth; I set 12″ minimum so pairs fit without toes overhanging.
- Standard shelf spacing stayed near 12″ so baskets and bins slide in without custom cuts.
The accessibility checklist
- Checked door swing so rods and shelves never block the opening.
- Planned a slim step stool spot for shelves 12–18″ from the ceiling.
- Set heights for the shortest user so daily clothes are reachable.
| Category | Measure | Baseline |
|---|---|---|
| Long dresses | Max hanging height | 52″ |
| Shoes | Depth per pair | 12″ shelf |
| Storage baskets | Vertical spacing | 12″ between shelves |
My prep was practical. I timed grabbing outfits and refined placement. For a simple inventory method, see this inventory guide that inspired my checklist.
Smart Layouts: Zones, Vertical Space, and Corner Solutions
Before any hardware went up, I taped out rods, drawers, and shelves to confirm clearances. That mockup made it obvious where double hang worked and where long hang belonged.

Double hang, long hang, and where I put shelves and drawers
I carved out double-hang bays where shirts sat above pants to save floor space. A dedicated long-hang section kept dresses wrinkle-free and visible.
Drawers stayed at waist height so daily items were easy to reach without bending to the floor.
Using high shelves, focal points, and mirrors to maximize space
I ran shelves up toward the ceiling and left 12–18″ below the top for an extra high shelf for off‑season storage. This stretched vertical storage without crowding the ceiling.
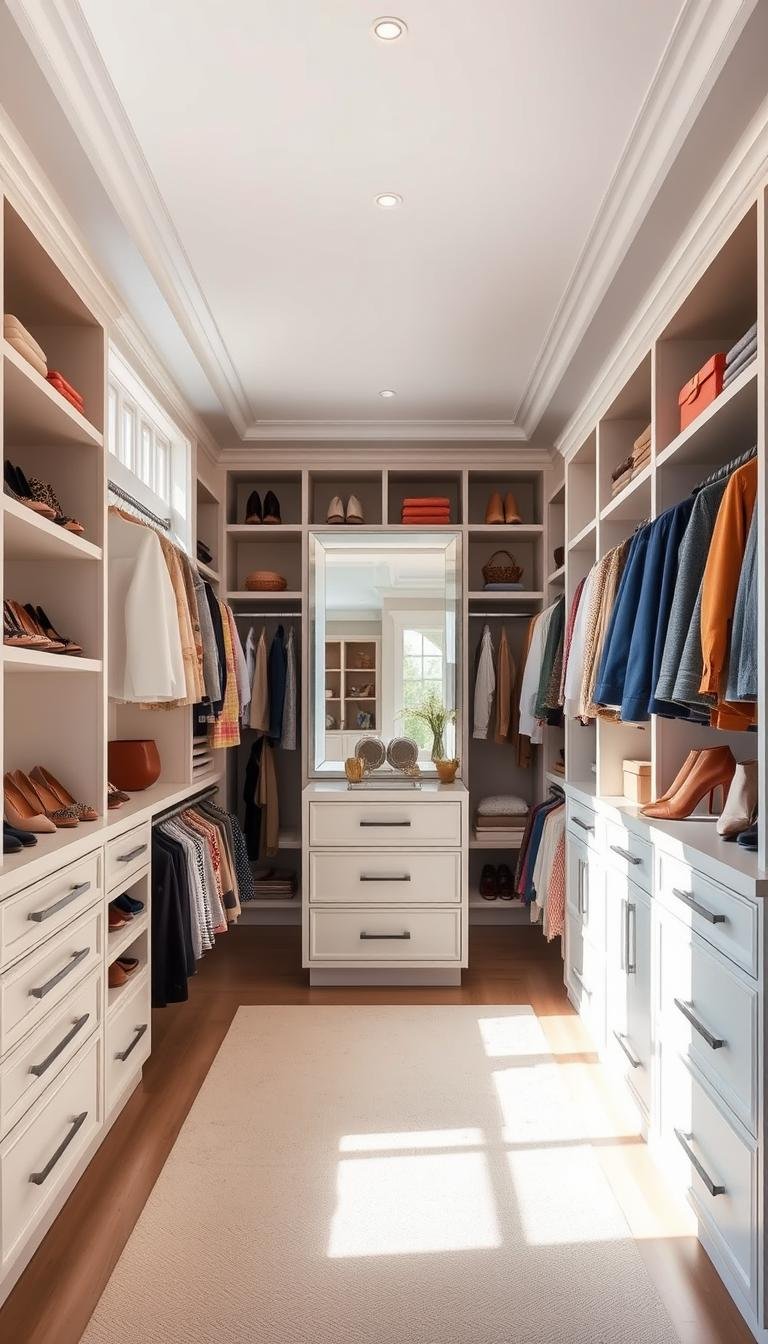
Opposite the entrance I placed a drawer bank and a statement mirror as a focal point. That choice made the room feel intentional and showcased my wardrobe.
Blue tape mockups to finalize the design before I build
Blue tape mapped 24″ of floor depth for hanging so shoulders never hit the walkway. I refined corners by using side-specific hanging instead of two rods colliding.
The tape test caught layout mistakes before any cuts were made. For one planning example, see this planning a closet guide that complements these steps.
- Group shelves next to hanging zones for faster outfit builds.
- Choose flat shoe shelves to pack more pairs safely.
Systems That Work: Drawers, Shelves, Bins, and Matching Hangers
I built a system that hides clutter and highlights the pieces I wear most.
My first move was to funnel small items into drawers. Socks, T‑shirts, jeans, and accessories live in deep drawers so surfaces stay calm.
File‑folding with spring‑loaded dividers made every item stand upright and visible. That cut time when I pick outfits.
I set shelves about 12″ apart and kept each shelf at least 12″ deep. That spacing lets baskets and bins slide in without hunting specialty sizes.
Opaque bins got clear labels so I never grab the wrong box from the top shelf. Heavy sweaters earned their own drawer section to avoid collapsed stacks.
I upgraded to matching slim hangers for shirts and jackets. The rod line looked cleaner and I actually gained hanging space.
- Drawers for small items and daily sweaters.
- Shelves for bulkier stacks and decorative baskets.
- Bins labeled by category to store off‑season gear.

| Piece | Use | Standard size |
|---|---|---|
| Drawers | Socks, T‑shirts, jeans, heavy sweaters | 14–18″ deep |
| Shelves | Baskets, folded items, lamp landing | 12″ spacing, 12″ depth |
| Bins | Seasonal storage, accessories | Opaque labeled containers |
| Hangers | Uniform slim hangers for shirts and jackets | Thin profile to gain rod space |
Storing by category first, then by color, kept my organization simple. The result: the closet feels like part of my home, not a catch‑all.
Small Walk-In, Big Impact: Narrow Walkways and Vertical Tricks
To make the small space feel open, I moved storage to the periphery and freed the center.
My baseline was practical: with a 4′ wide minimum, I set built-in shelves 12″ deep so a 31″ walkway stayed clear. That depth fits baskets and keeps the floor visible.

Using side walls, over-door organizers, and above-door hooks
I used side walls for vertical strips to hold belts, jewelry, and small purses. That small change kept bulky items off main shelves and out of reach paths.
Hooks above the door held hats and light accessories. This used otherwise wasted header space without crowding the entrance.
Slim shelving, no-door choices, and keeping the floor clear
I skipped a door to avoid swing clearance loss. Slim hangers reclaimed inches on each rod and kept hanging lines neat in the tight size.
Over-door organizers went up only where they would not collide with shelves or hangers. I stored infrequently used items up high and relied on one or two labeled bins to corral small categories.
| Constraint | Solution | Result |
|---|---|---|
| 4′ room width | 12″ deep built-in shelves | 31″ clear walkway |
| Limited floor space | Vertical strips & above-door hooks | Floor stays clear for movement |
| Rod crowded | Slim hangers & measured spacing | More hanging capacity, tidy lines |
| Small items | 1–2 labeled bins | Less visual clutter, easier access |
- Measure twice: at this size a quarter inch matters for shelf spacing and bin height.
- Use side walls and overhead space to make the room feel larger.
- Keep the floor clear so the closet functions like a room, not a pile.
Shoes, Bags, Jewelry, and Accessories: Boutique-Style Storage
I treated shoes like a display, lining flat shelves from floor to ceiling and grouping by color and style. That run of flat shelving kept every pair visible and prevented slipping that tilted racks can cause.

Floor-to-ceiling shoe shelves and why I avoid tilted racks
I ran flat shoe shelves straight up the wall so each pair sits level and easy to reach. Tilted racks wasted depth and sometimes let toes slide over the lip.
Handbag hooks, dividers, and a jewelry wall I can see at a glance
I hung bags on sturdy hooks so straps stayed smooth and selection was instant. Clear shelf dividers stopped folded stacks from toppling.
My jewelry wall used tiny hooks so necklaces, earrings, and bracelets were visible instead of buried in boxes.
Transitional spots: valet hooks for yesterday’s jeans and dry cleaning
I added a valet hook near the entrance so transitional items had a home. That small node kept the rest of the closet tidy and ready.
- Display and density: balanced so the collection looks curated without losing storage.
- Heavier boots live higher on deep shelves; daily pairs stay lower for fast grabs.
- When everything is visible, outfits come together faster and the space feels elevated.
Design Details That Elevate Style: Lighting, Wallpaper, and Seating
By balancing bright overhead bulbs with a warm dresser lamp, the closet became a usable, welcoming room.
Lighting was the first upgrade. I used high-wattage fixtures and LEDs so colors in my wardrobe read true and details pop. A small lamp on the dresser added warmth for late-night prep, and I ran power to that outlet during the build.

High-wattage lighting, LEDs, and smart lamp placement
Layered light makes the space perform and feel larger. Overhead LEDs give task light, while the lamp creates a soft pool near the mirror.
Peel-and-stick wallpaper, art, and finishes that feel like a boutique
I applied peel-and-stick wallpaper above shelves and hung art to tie the closet into the bedroom suite. The pattern added personality without long-term commitment and lifted the overall look.
Islands, vanities, and ottomans with hidden storage
I tucked a compact vanity into an open bay and added a cube ottoman with hidden storage. That seat gave me a place to sit and stash extras while keeping pathways clear.
| Feature | Benefit | Practical note |
|---|---|---|
| High-wattage + LEDs | True color, clear details | Plan outlets early |
| Peel-and-stick wallpaper | Pattern without commitment | Apply above shelves |
| Cube ottoman | Seating + hidden storage | Choose wipeable fabric |
Small changes made this closet feel like an addition to my home. Durable finishes kept high-touch areas fresh, and cohesive details created a calm, boutique look that invites daily use.
How Do I Organize a Walk-In Closet for Maximum Efficiency and Style? My Step‑By‑Step
I tackled the closet in rounds: purge, sort, then assign each group a permanent spot.

Purge, categorize, and color-code
I started with a serious purge. I made keep, donate, and mend piles so only useful clothes stayed.
Next I grouped by type—shirts, pants, sweaters—and then arranged each group by color. That method made outfits easier to spot and cut decision time each day.
Assign homes and label
I assigned every category a home. Drawers held tees and folded sweaters; shelves stored baskets and bins for accessories and scarves.
Labels went on opaque bins and baskets so off‑season pieces stayed invisible but findable up high.
Final pass: utilities and quick test
I file‑folded into drawers with spring dividers so every tee and sweater stood upright. I updated hangers for a uniform rod and installed a valet hook and hamper to keep the floor clear.
I added a tiny trash can and planned an outlet for a lamp to handle tags and cords. Then I ran a quick time test on a weekday morning and tweaked one or two homes until the system felt effortless.
| Step | Storage | Benefit |
|---|---|---|
| Purge & sort | Bins, baskets | Less clutter, easier choices |
| Color-code | Shelves, rods | Faster outfit picks |
| File-fold | Drawers with dividers | See every item, no rummage |
| Utilities | Hamper, hooks, outlet | Cleaner space, better workflow |
Conclusion
Little moves—taped mockups, labeled bins, and matched hangers—added up to a closet that works and looks good.
I landed on a simple formula: measure honestly, map with blue tape, plan zones, then build shelves, drawers, and rods to fit. I used vertical space with high shelves 12–18″ from the ceiling and parked off‑season clothes up top so daily access stayed seamless.
Flat shoe shelves and matching hangers polished the look while packing in capacity for shoes and pants. A few labeled bins, a hamper, a valet hook, and better lighting made this room perform like a boutique but feel like home.
Start small with one example layout—double‑hang plus drawers—and adjust from there. The result: a calm space where items are visible, reachable, and easy to maintain.